One thing you can say about Clara Nartey is that she’s persistent. The word ‘can’t’ simply doesn’t exist in her artistic vocabulary.
Whether tackling a new stitching technique, figuring out how to work with a digital app, or navigating social media, Clara just won’t quit. She’s even set up year-long personal challenges to achieve her goals.
Largely self-taught, Clara was determined to learn how to draw with a needle and thread as she would a pen or pencil. She also committed to infusing her African heritage into everything she made. After tireless years of practice and the help of key mentors, Clara’s unique approach to free motion stitch is stunning. And the way she designs her own fabrics is icing on the cake.
In addition to making art, Clara also dedicates time to inspiring and motivating other artists. Clara’s persistence was fueled by her belief in herself as an artist, even in the wake of her mistakes and failures. Clara knew she had to be her own cheerleader, and she now helps other artists build their confidence to create and share their work.
Clara’s story is a great reminder of how persistence can pay off in big ways.
Sewing room dangers
Clara Nartey: The first textile art I remember creating was a crocheted table top piece. My mom taught me to crochet, and I enjoyed it very much. I eventually crocheted better than she did, including creating 3D animals.
I also grew up watching my mom machine embroider. She lovingly embellished our clothing which made me feel special anytime I wore one of those embroidered outfits. But she was scared to let me go near her embroidery sewing machine, let alone use it.
She also worried I’d hurt myself with her very heavy metal tailor’s scissors. One day they were hidden under a pile of fabrics. When she went to gather those fabrics, the scissors fell off the worktable and landed point-side down, piercing her foot. She had to use crutches for months after that.
So I’m guessing she only taught me how to crochet to avoid using machines or dangerous tools.
Learning trajectory
I’m largely self taught, but I’ve also had people guide me along the way. Of course, my mom’s refusal to teach me how to machine embroider only made me gravitate to it even more. So, later in life when a family friend asked if I could monogram something, I bought my first embroidery machine and taught myself how to use it.
I also read lots of books on textile art, watched videos, and then took a year-long online master class with Elizabeth Barton. That’s when I had my first lessons in art and design. I also took a live five day workshop with Elizabeth, and subsequently, she taught me how to dye fabric.
I then took a textile design course with Bonnie Christine and her year-long group membership programme. And I took a course in colour studies at the Gail Harker School of Creative Studies.
”Although I don’t have a formal art education, I seek to create art with the same basic art foundations of drawing and sketching, and a stitched line is my means to that end.”
Clara Nartey, Textile artist
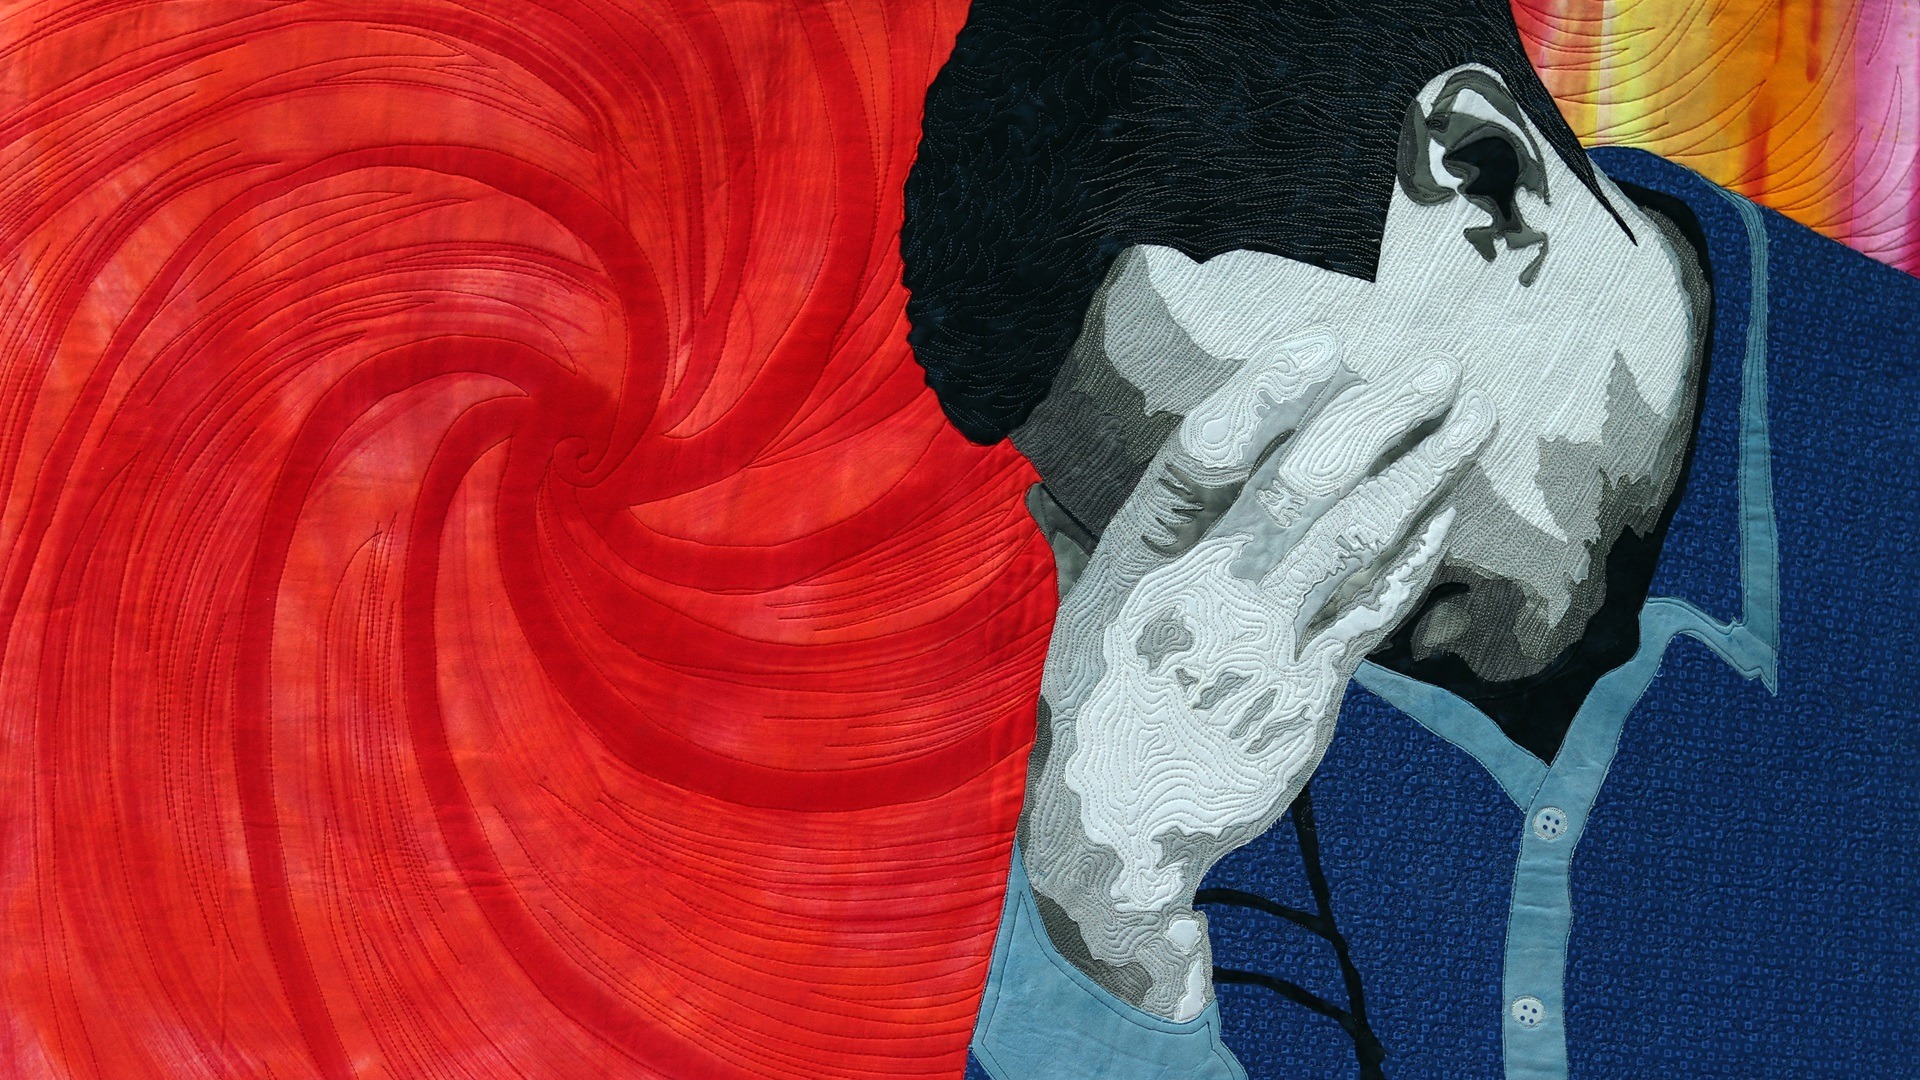
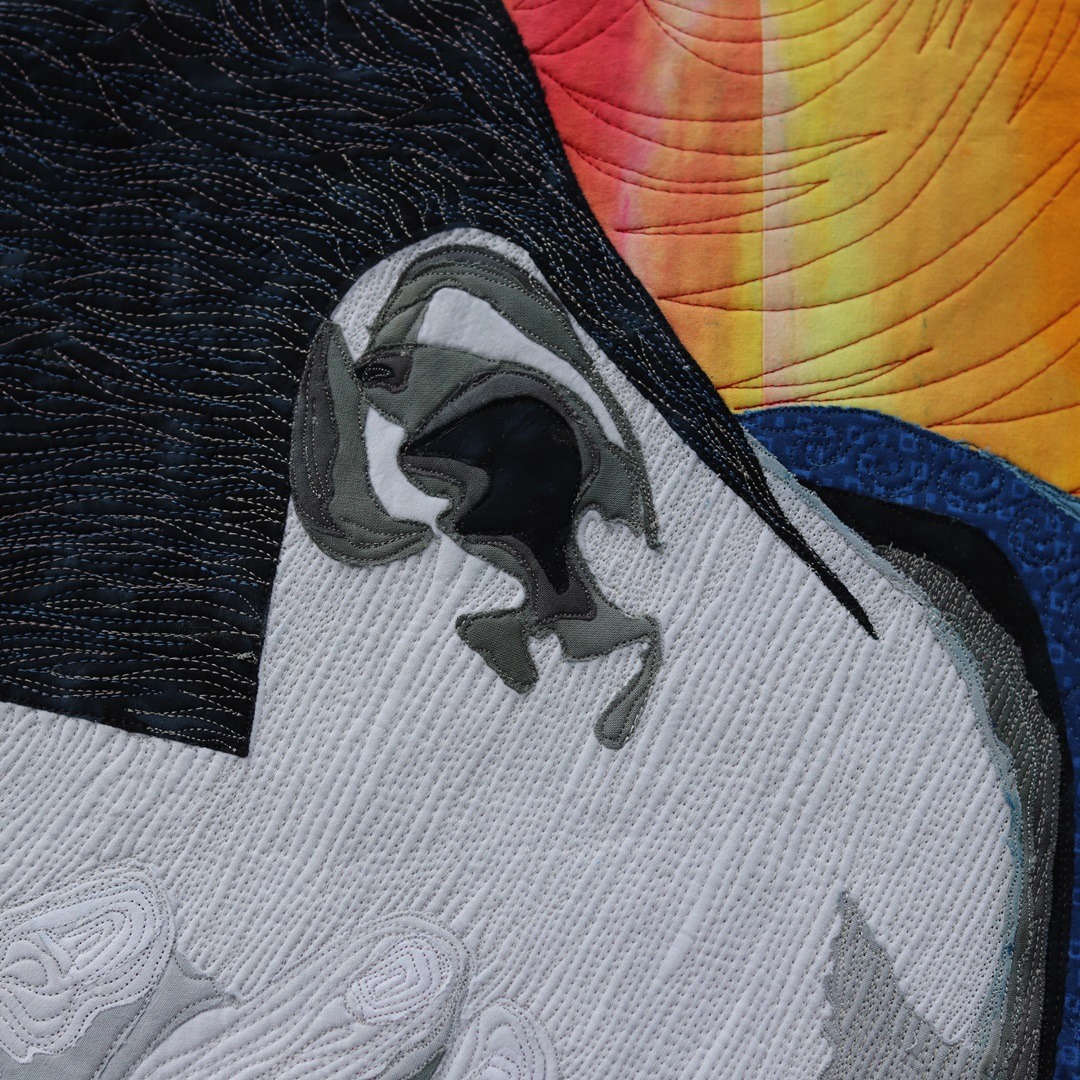
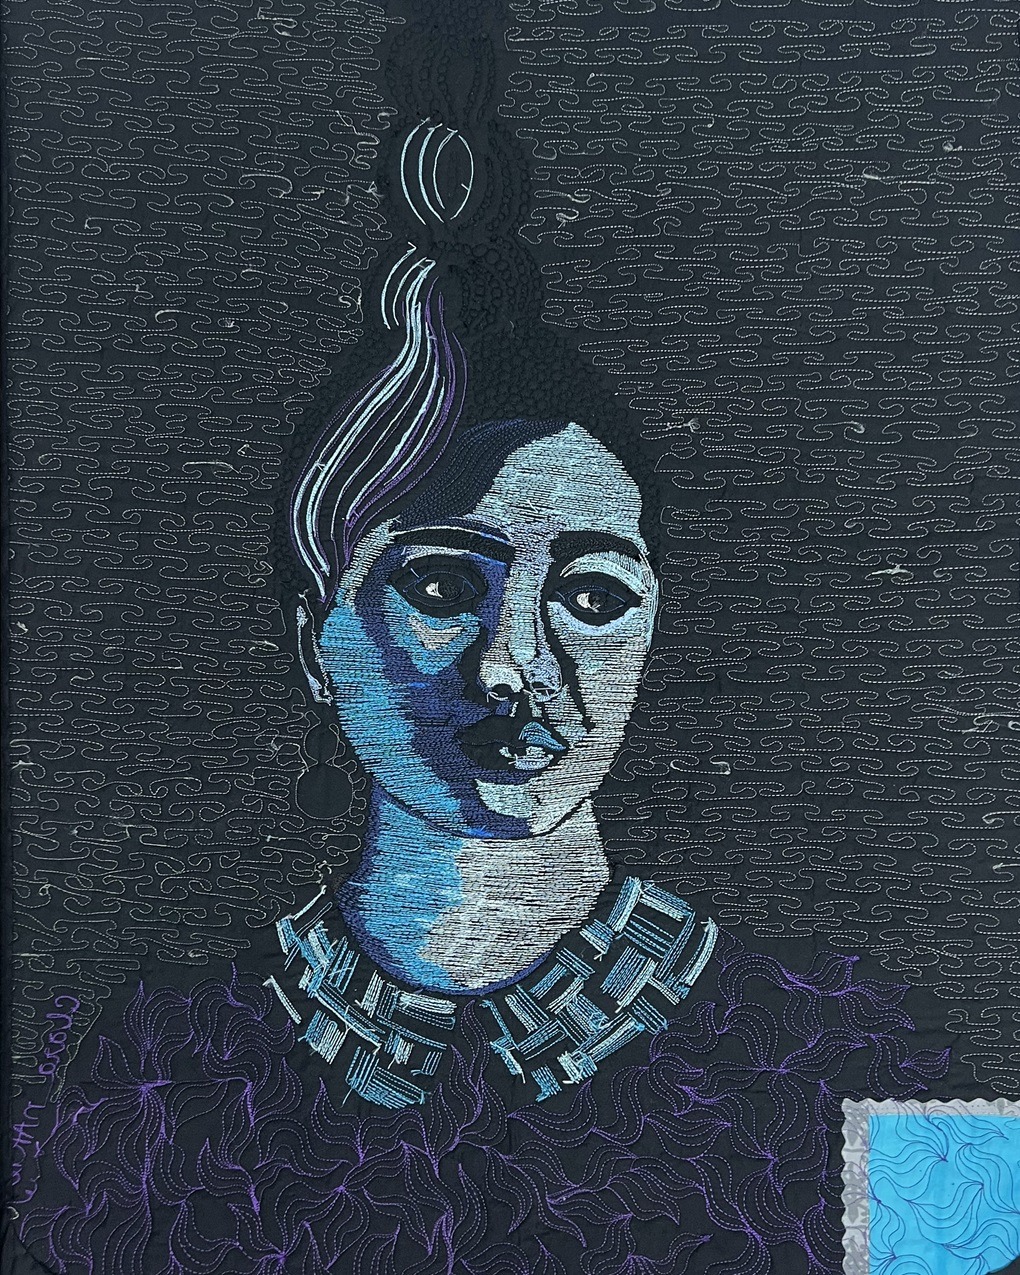
When I started my adventures in textile art, I tried a lot of techniques, including traditional quilting, appliqué, hand dyeing fabrics and free motion stitching. One of my earlier works, Whirlwind Thoughts, demonstrates a mashup of techniques with its different values of threads on the face, cut up fabrics for the clothes, and hand dyed and painted fabrics in the background.
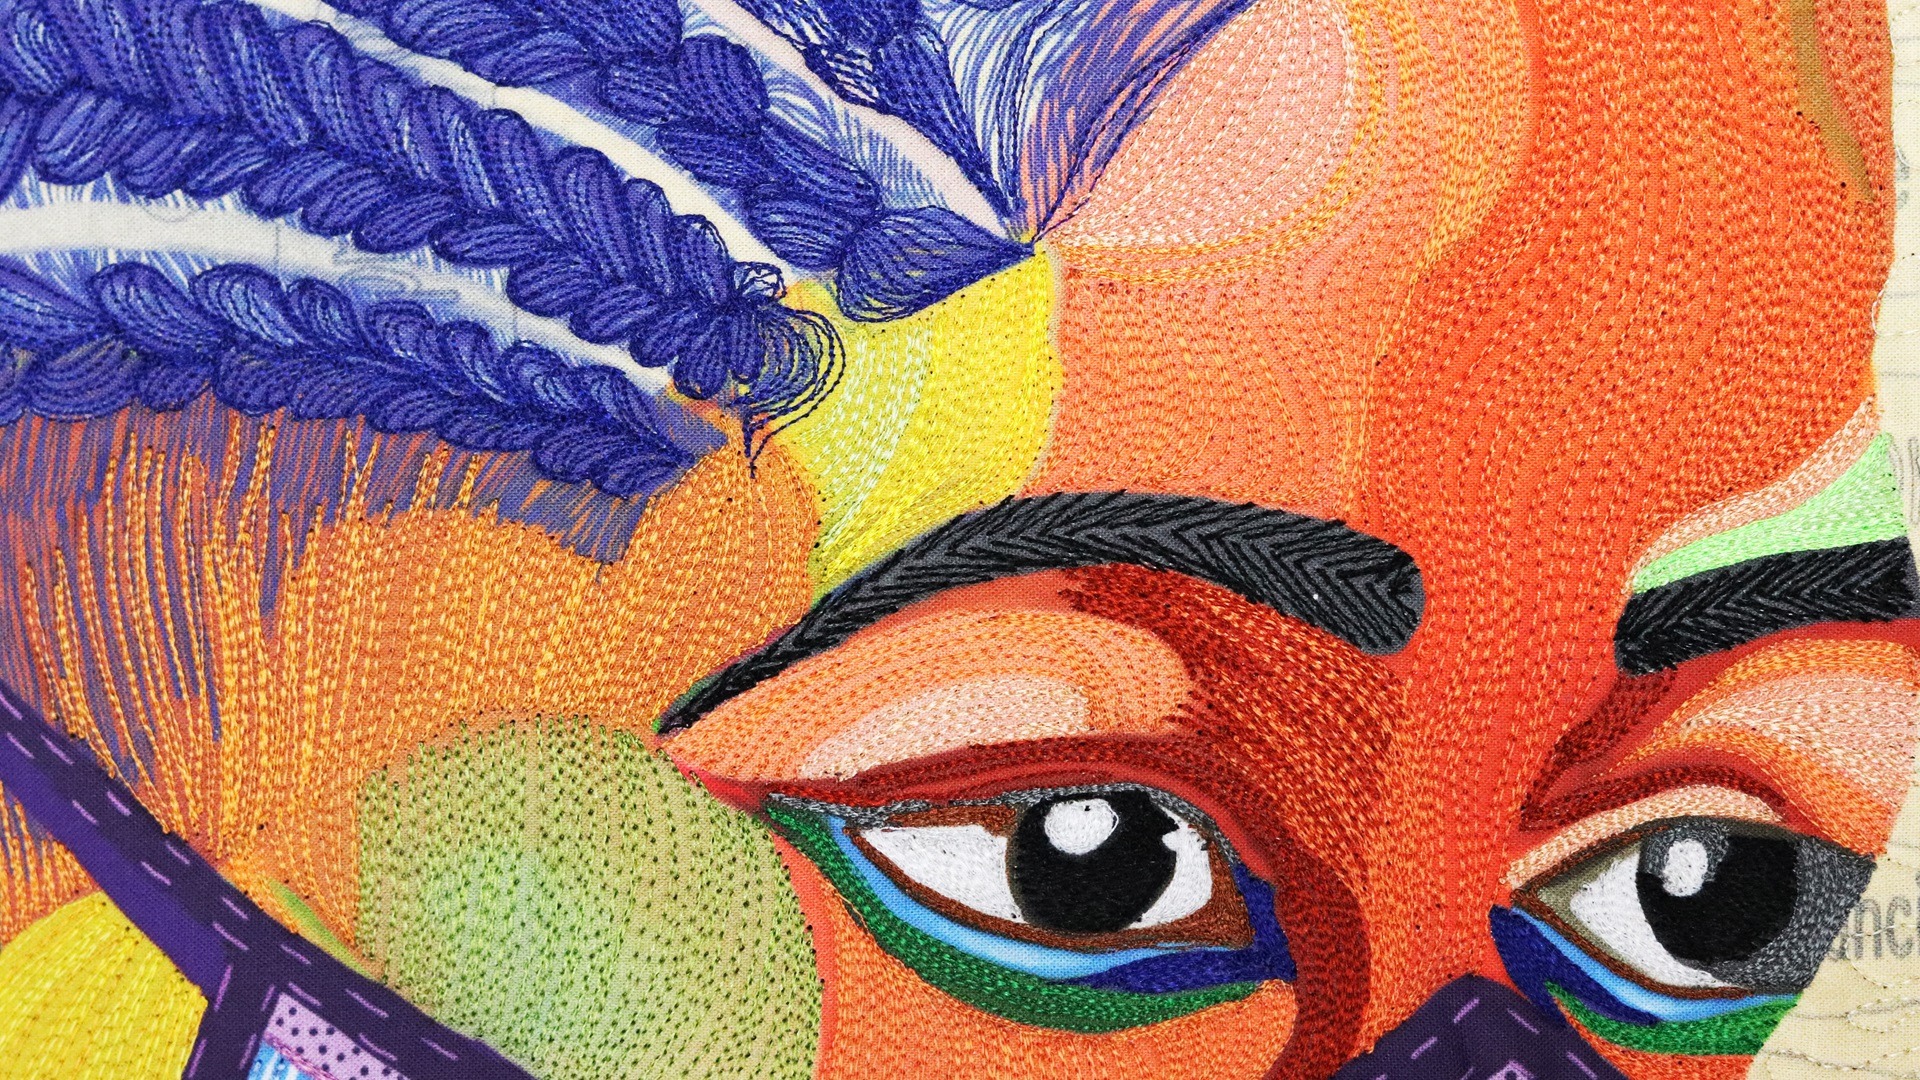
But as I continued to experiment, I always seemed to come back to the drawn line. I think my years of watching how an embroidery machine can create images from stitches inspired my ability to see the mark making possibilities of stitched thread.
So, I decided to start using machine stitching the same way one draws with pen and ink. The simplicity of a stitched line is appealing, and the ability to use it to create art is fascinating to me.
I’m often asked how I would describe my textile art. Quilting? Appliqué? The fact is there’s no single label I could use. My art is a composite of different art techniques I’ve learned along the way, including embroidery, quilting, textile design and digital printing.
Stories to tell
Each of my works usually starts with an idea or theme I want to express. I’ll write down my initial thoughts and things I want to say through the work and then use that information as my guard rails. Invariably, I’m not able to fully express a thought in just a single piece, so I often end up working in a series to express different aspects of my original thought.
“My subjects are sometimes family and friends, and some are people I don’t know.
Overall, I try to portray an idea more than an exact likeness of a person.”
Clara Nartey, Textile artist
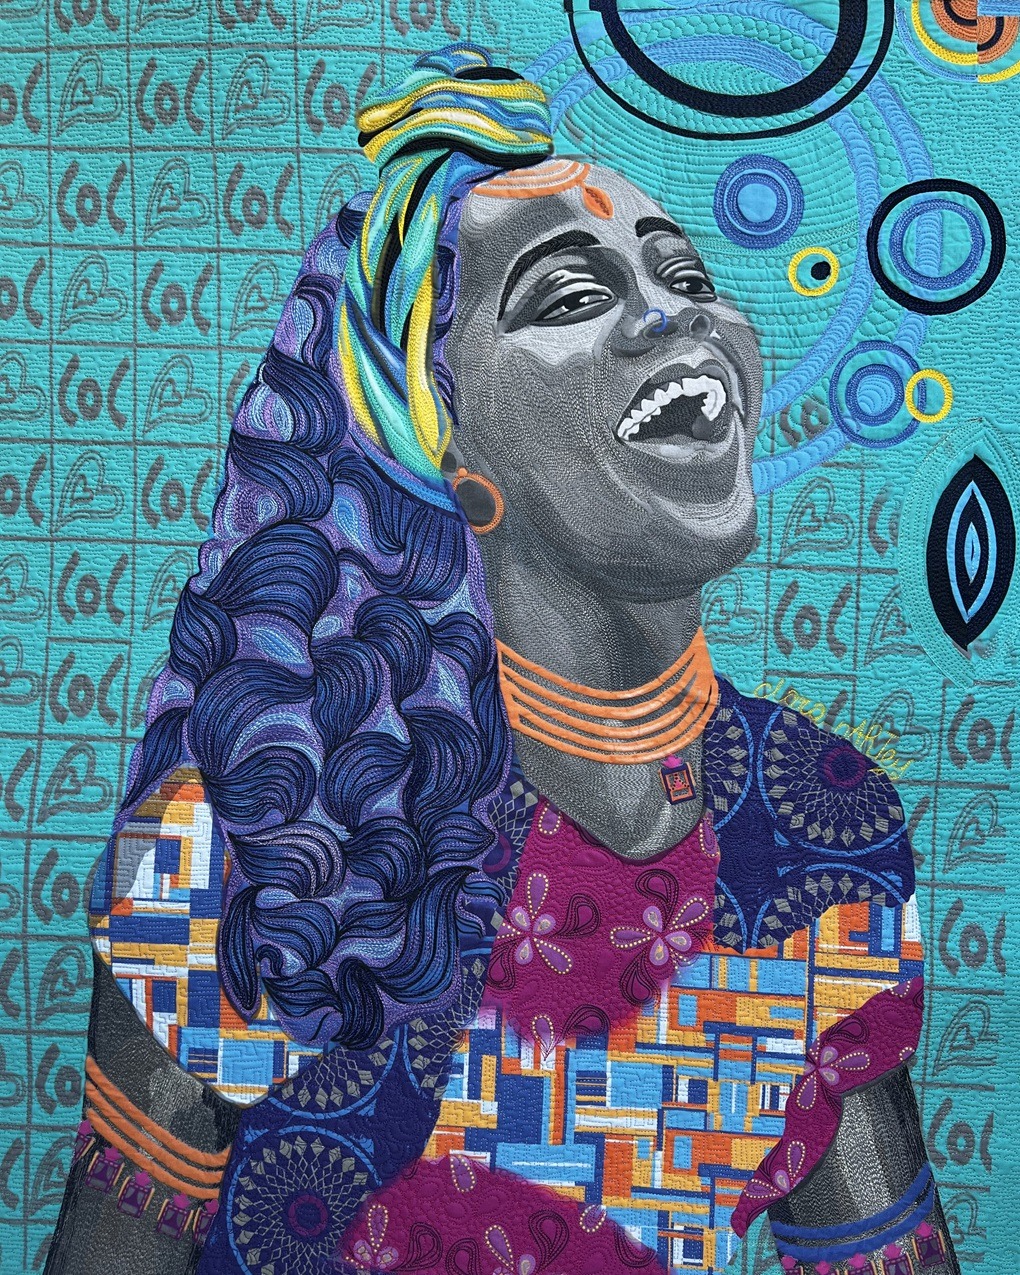
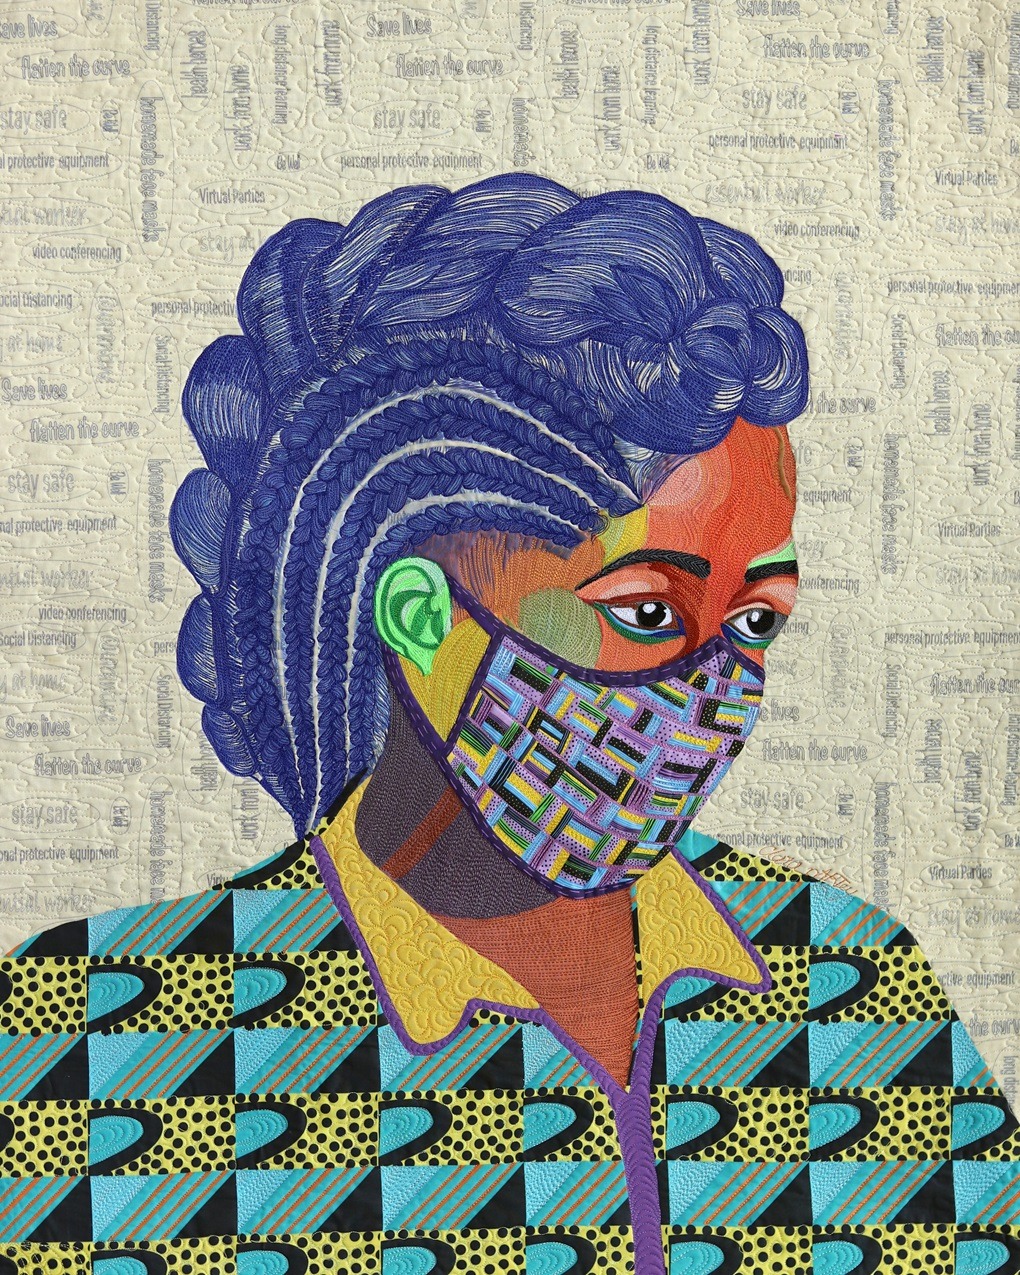
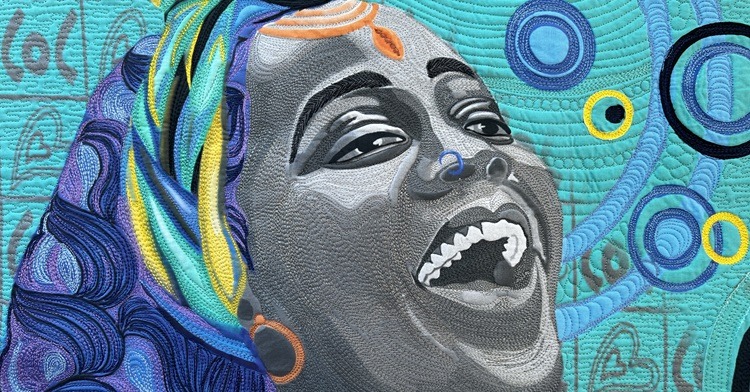
For example, in Bubbly, I wanted to depict the joys of everyday life. The pandemic was raging at the time, so I wanted to create a work that countered the gloominess and death. I wanted to create something happy, so I chose a model who was laughing.
In Charleena, I sought to tell the story of how Blacks have encountered untimely deaths during interactions with the police. The subject is Charleena Lyles, a young, pregnant woman with mental health issues. She was fatally shot in her home during a police altercation in Seattle, Washington (US).
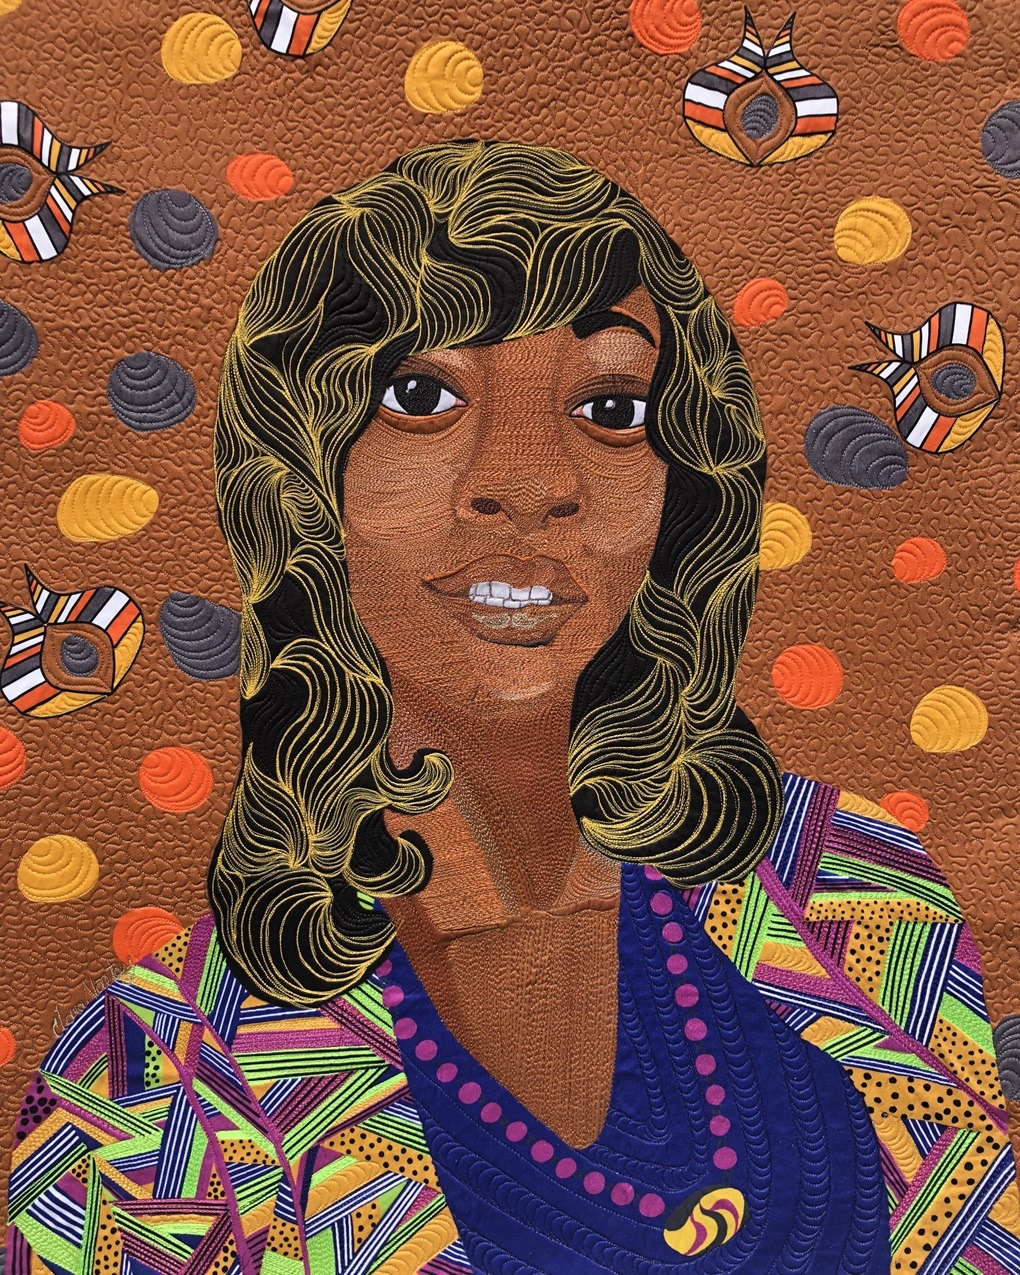
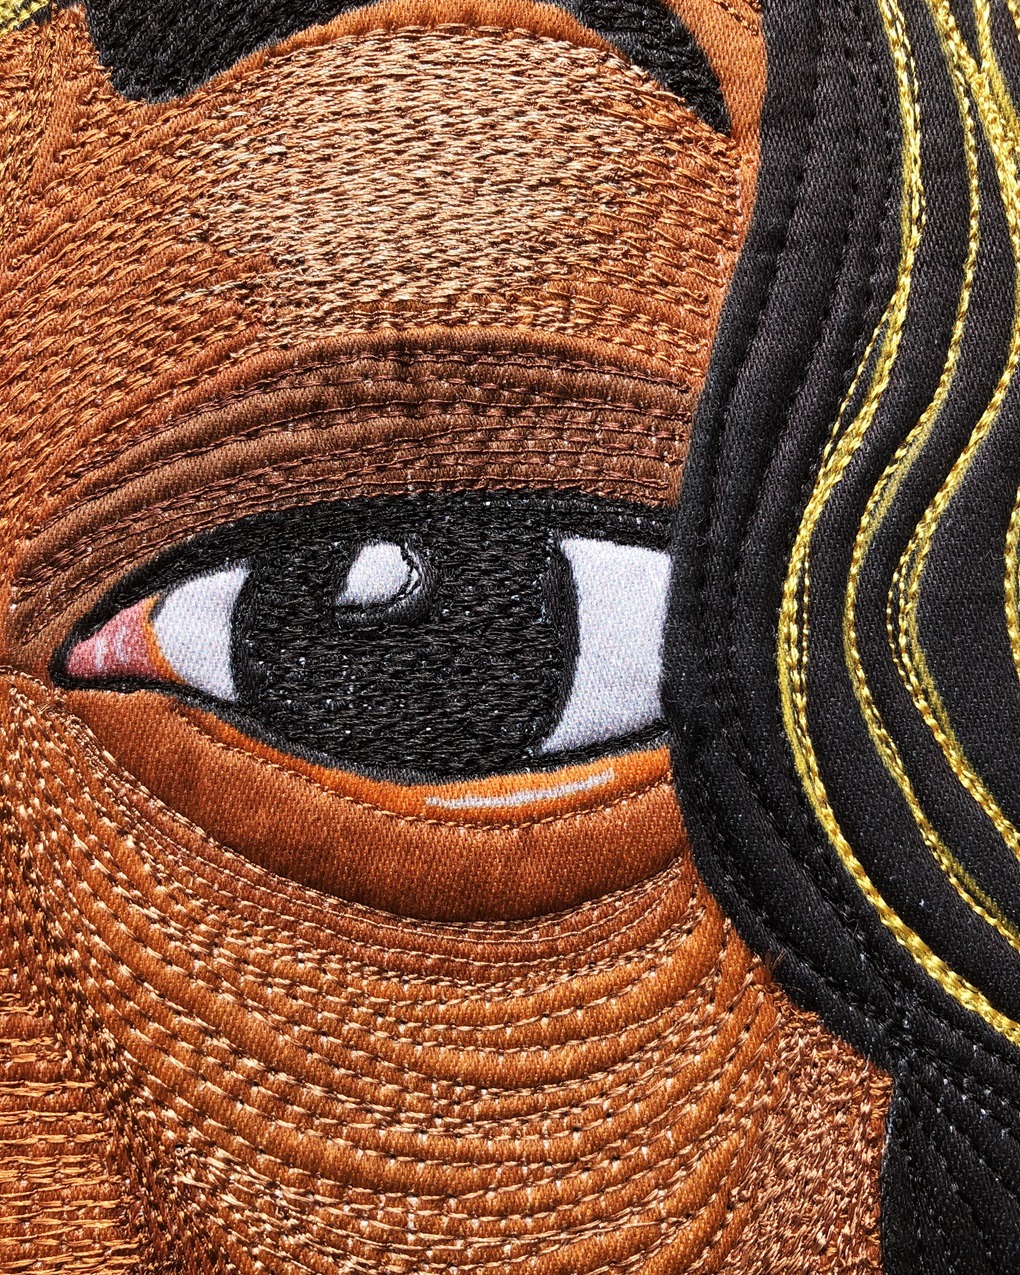
African inspiration
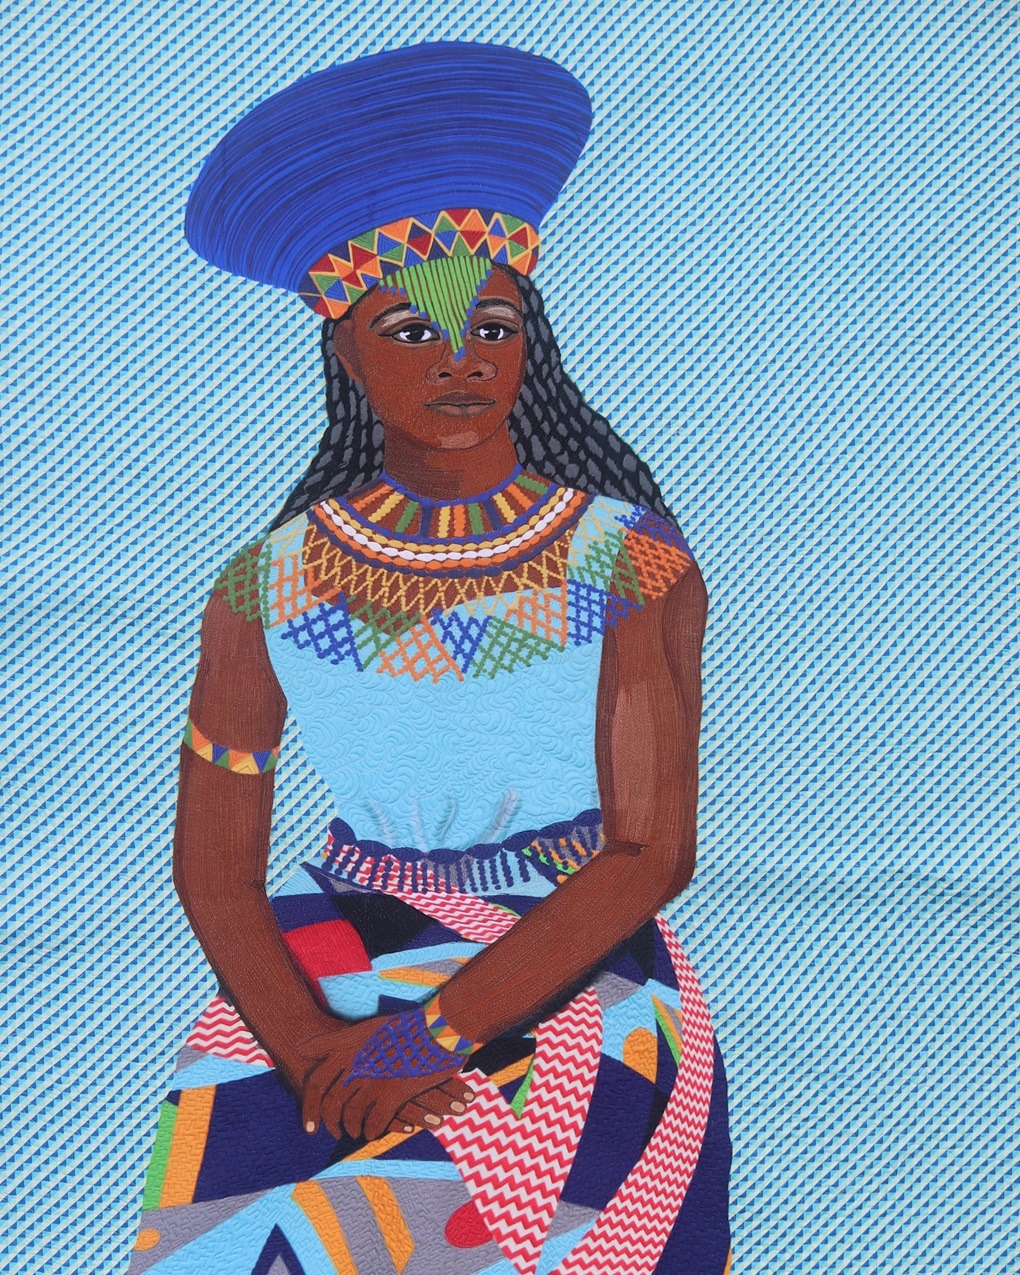
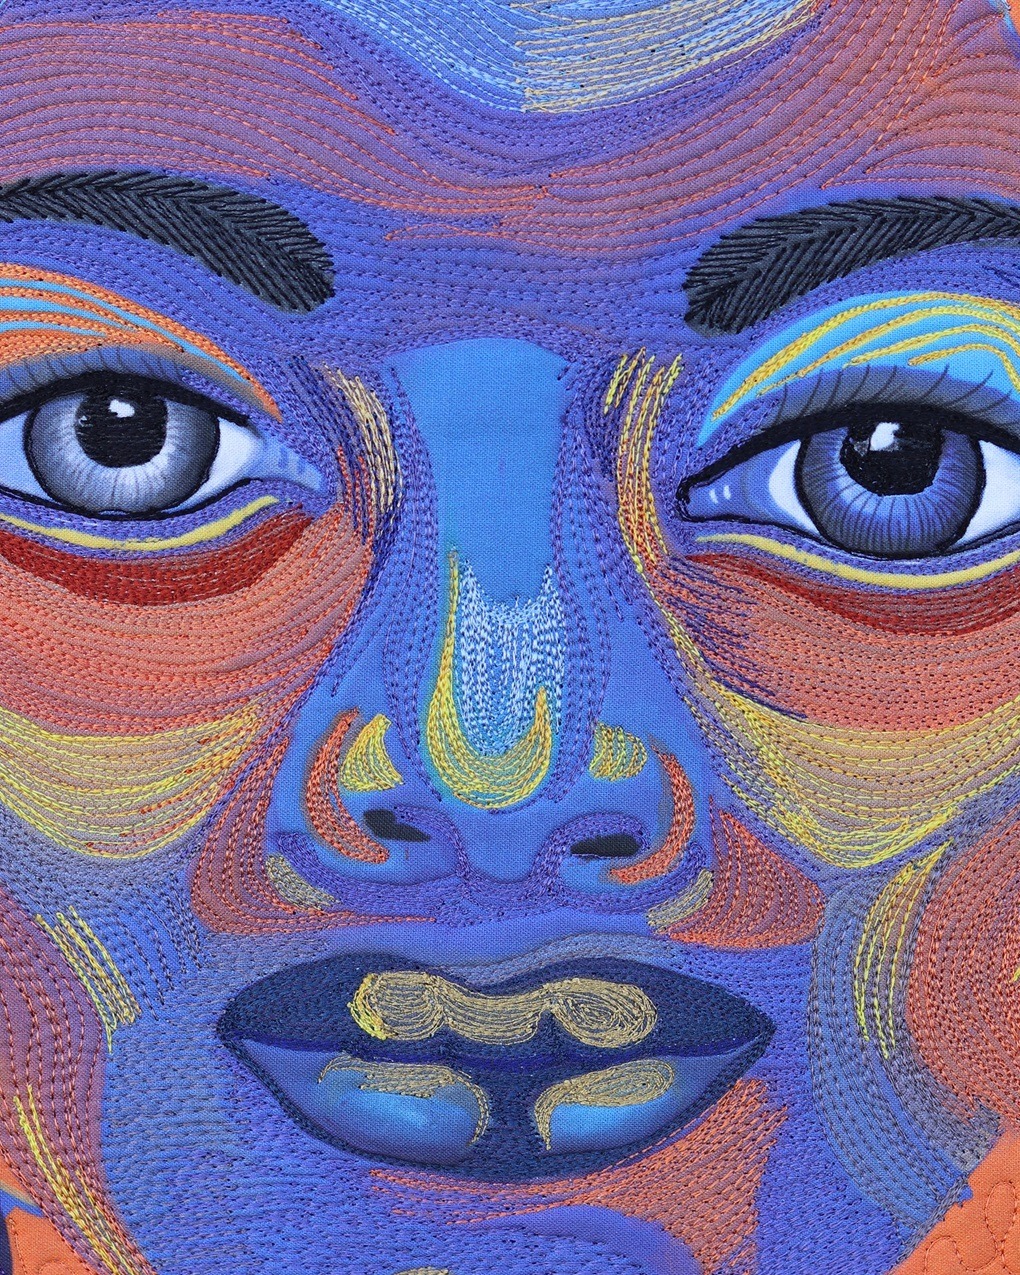
I was born and raised in Ghana, before moving to the United States where I’ve lived almost as long as I lived in Ghana. Machine embroidery is very much a part of Ghanaian fashion. Clothes are elaborately designed with embroidery, especially around the neckline which we call ‘joromi’.
The first time one of my Ghanaian friends saw my thread work, they exclaimed ‘you are using joromi to draw!’.
Fabrics are also used for storytelling in Ghanaian tradition. We use fabrics to memorialise life events like birth, marriage or death. Those memorial fabrics usually have symbols or motifs that have significance or tell a story, which is why I use fabrics and threads to both draw and narrate stories.
I use the ideas of traditional Ghanaian block printing techniques, especially when incorporating Adinkra symbols into my work. Adinkra is a writing system that consists of pictorial symbolism created by the Ashanti craftsmen of Ghana. The symbols can represent various ideas related to life’s lessons.
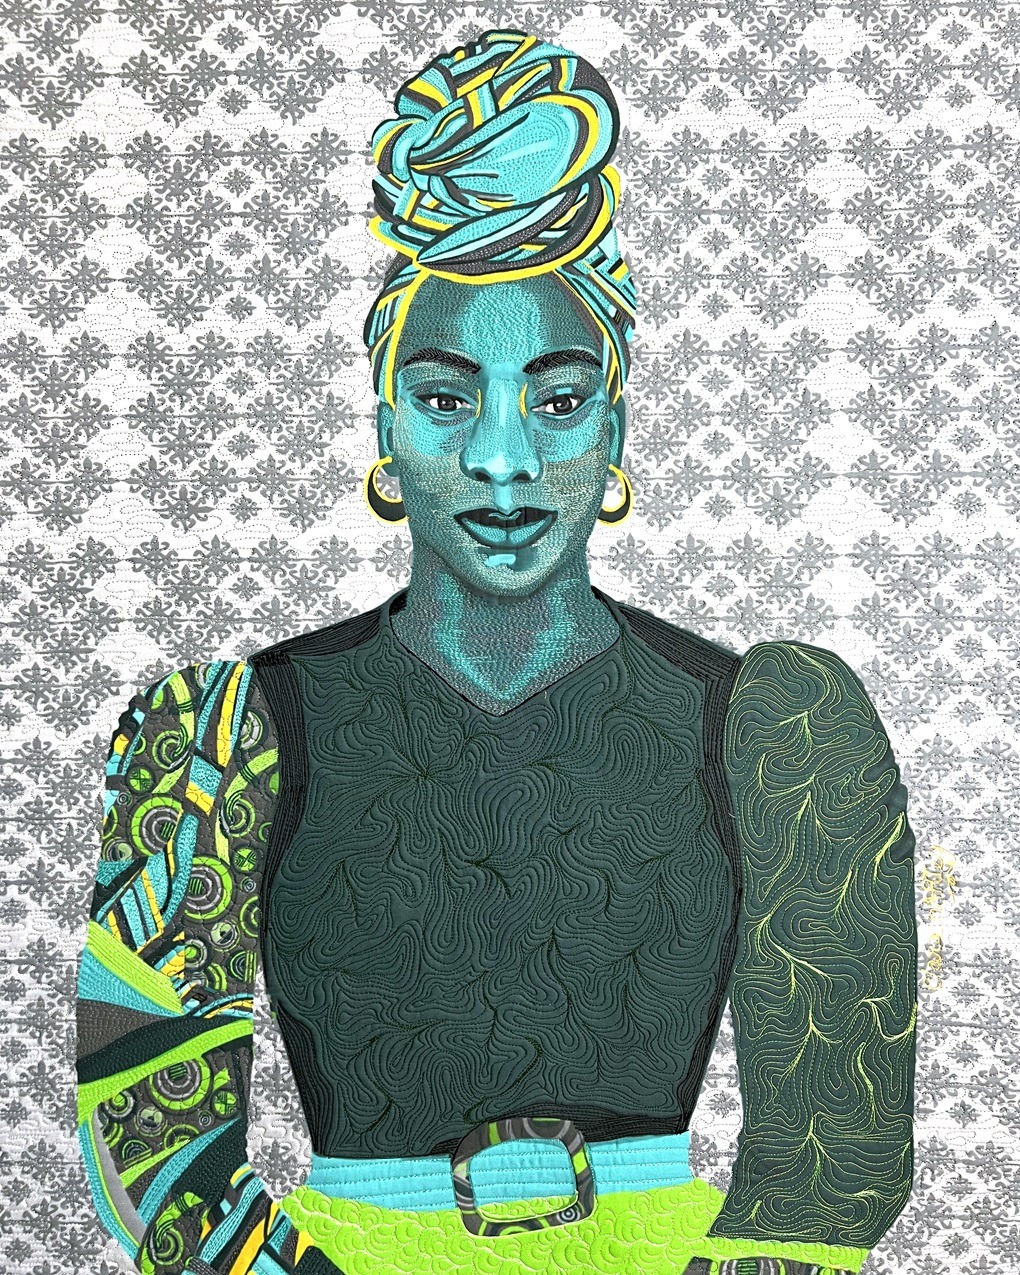
Representing kente cloth in my work is also important to me. The figure’s head wrap in Gele: The Skyscraper is a good example. Kente is a woven and then strip pieced cloth. Since kente is strip pieced, I often incorporate squares, rectangles and other blocks of colour to reference the look of the kente cloth in both subtle and overt ways.
“Incorporating images of kente is my way of holding onto the edges of the national fabric of the country of my birth.”
Clara Nartey, Textile artist
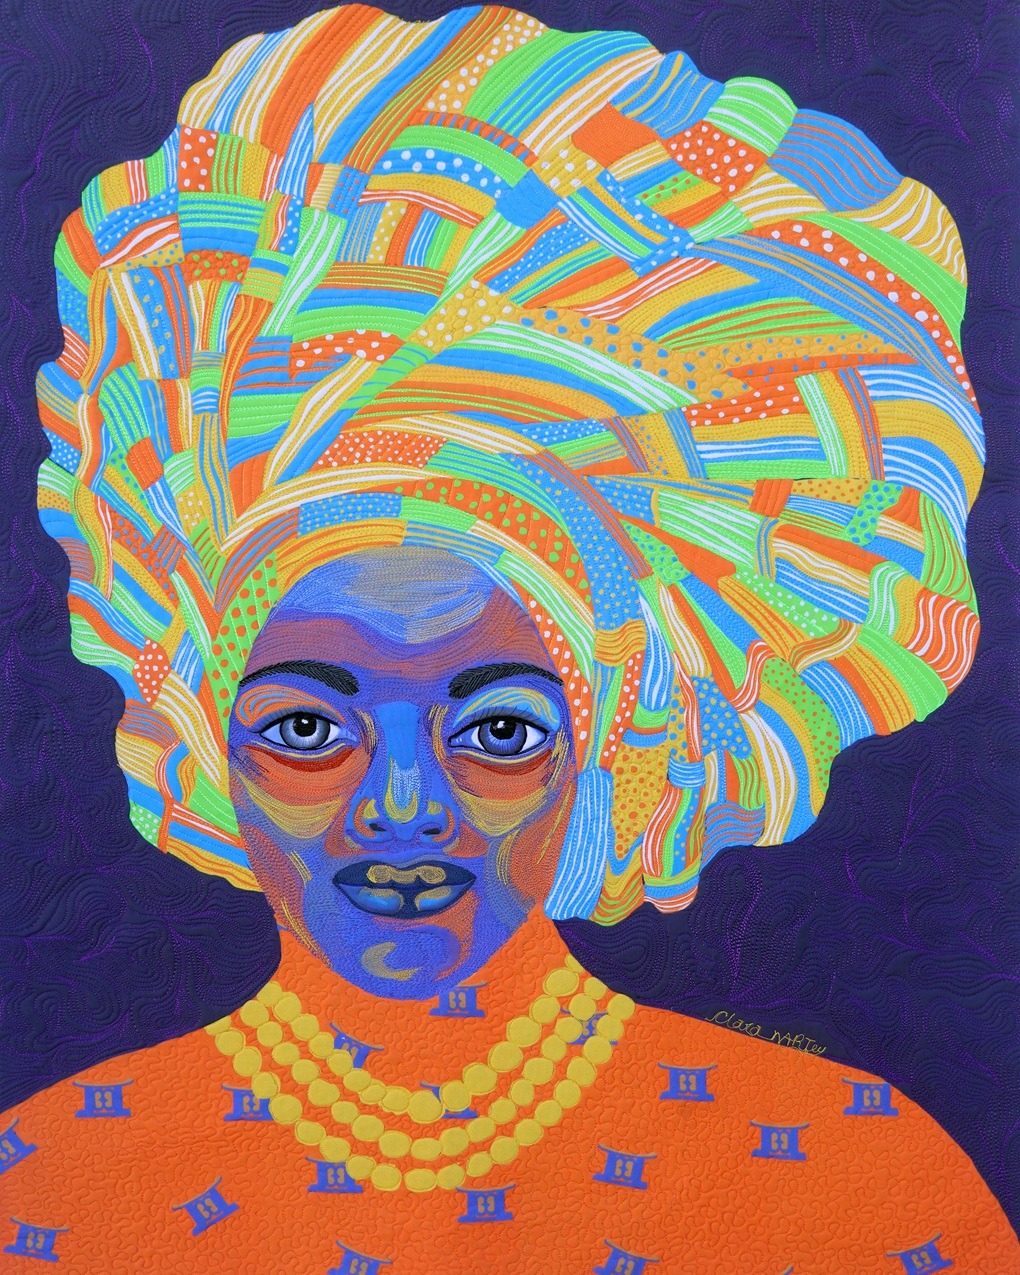
Going digital
I use photographs as references for my subjects, and then I create a line sketch from that image. I’ve recently begun to rely on my iPad as a sketching tool instead of a sketchbook. I use the Procreate application, which allows me to work on all the colours and shading on my iPad.
I initially had to get used to the Apple pencil’s pressure sensitivity when drawing on the iPad. It’s very different from using a regular pen or pencil on paper. I used to hold the Apple pencil too hard, but over time, I’ve learned to loosen my grip.
“Now that I have better control of the Apple pencil, I have access to an unlimited palette of colours compared to traditional paints or coloured pencils.
I also find I experiment more and try different options on the iPad than I would in a traditional sketchbook.”
Clara Nartey, Textile artist
Once I’m pleased with my portrait sketch, I shade the skin tones, always starting with the face. I then design all the fabrics using shapes, colours and symbols that match the theme or story I want to tell. I then design the colours and patterns for the other fabrics that will be featured in the work, including the subject’s clothing.
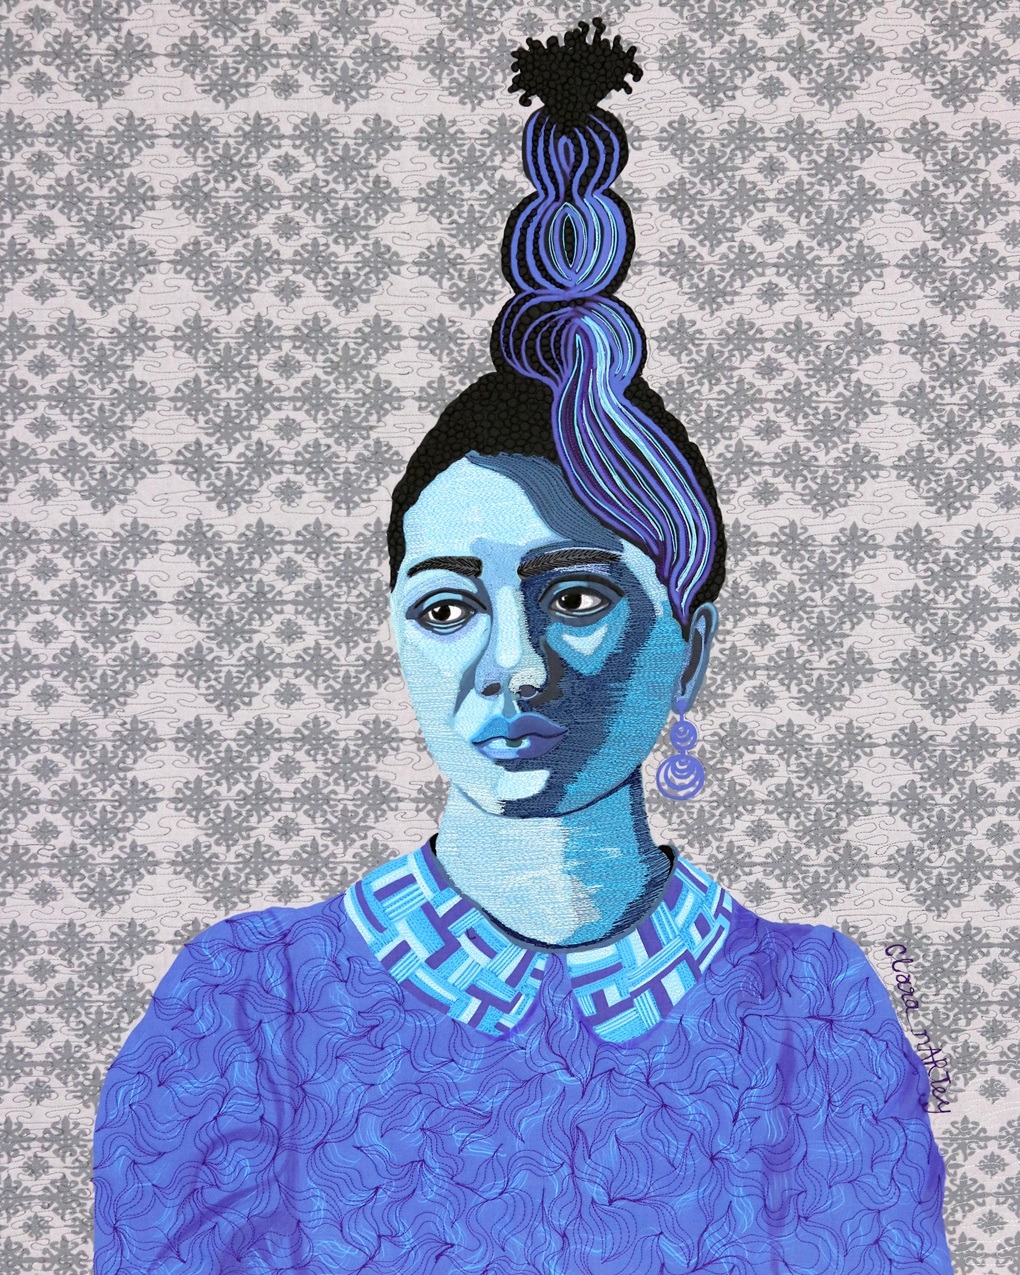
Again, incorporating African Adinkra symbols is important for me. For example, in Emerald and Sapphire, I drew a symbol of Siamese crocodiles to use for the background fabric in both pieces. They are part of a series called Gem Series, and the series’ theme is ‘although we’re different, there’s more that unites us than divides us’.
The crocodile symbol depicts how absurd it is for the Siamese crocodiles to fight when, although they’re different, they’re still joined in the belly and, hence, they’ll have to agree with each other to be nourished.
When the final composition is in place on my iPad, I send all the digital files to Spoonflower, an on-demand fabric print company in the United States. I have them print the full composition on one piece of cloth, like a large fabric poster. And then additional yardage is printed with my different fabric designs.
Let the stitching begin
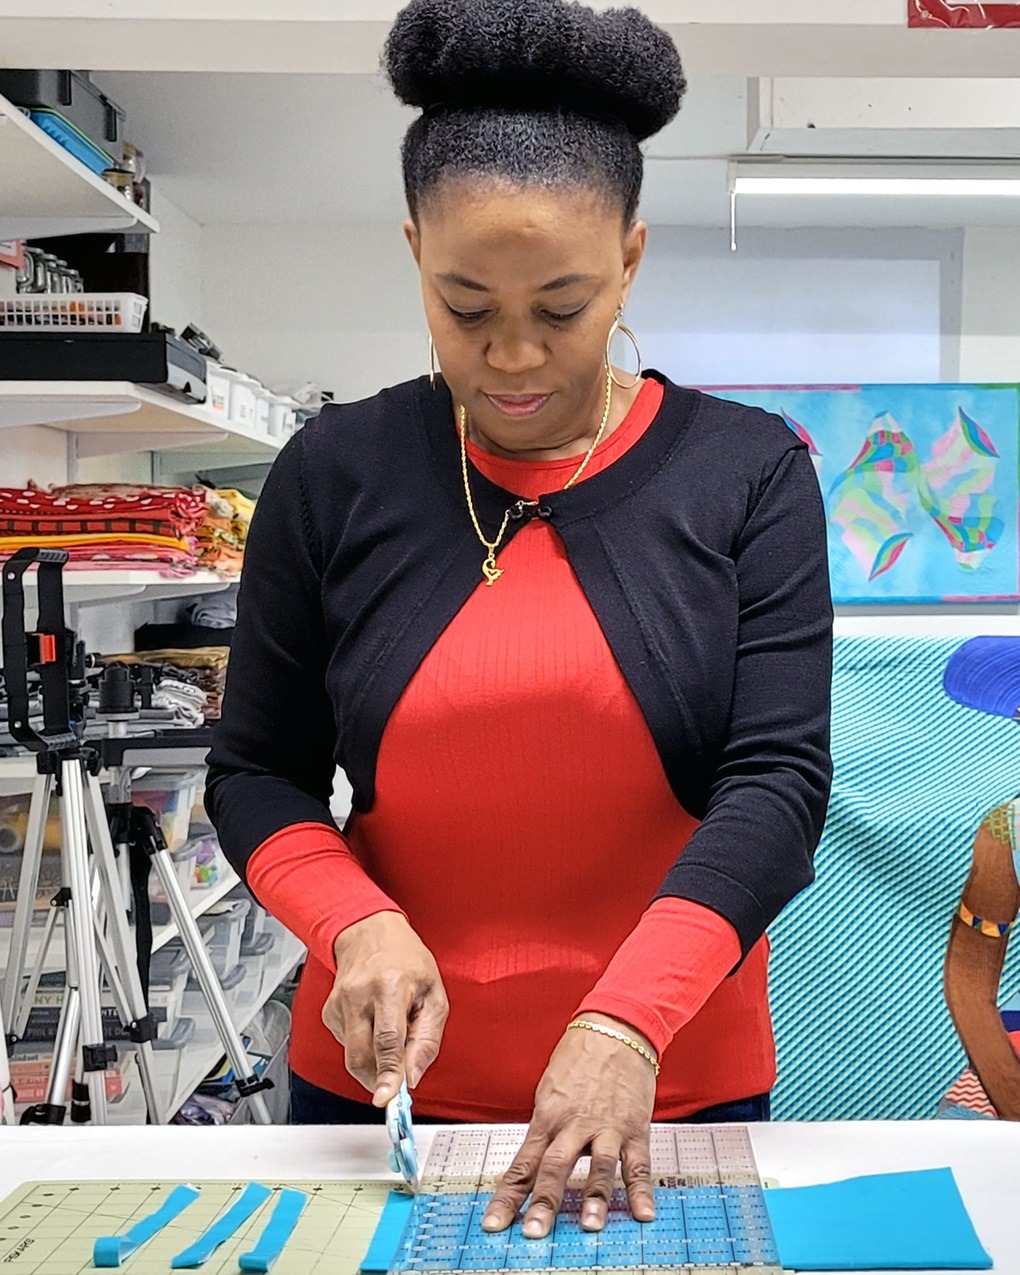
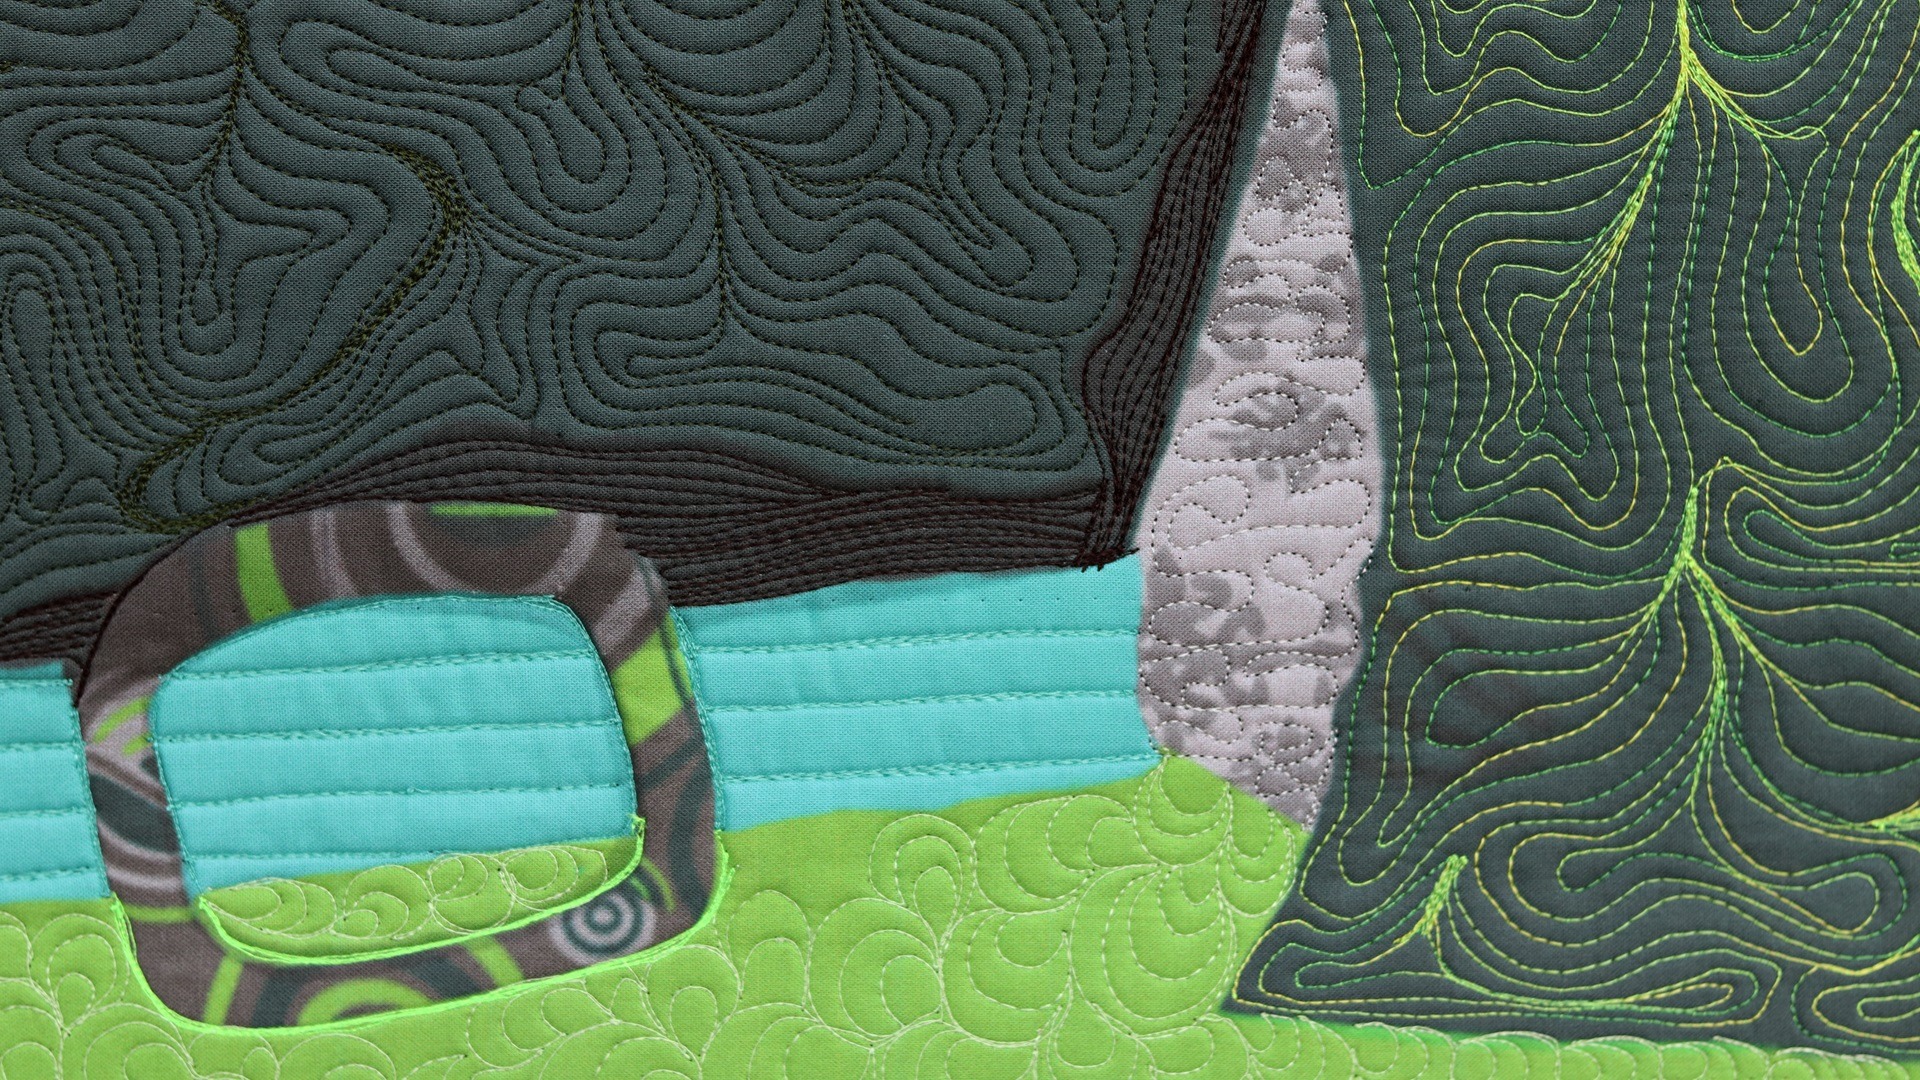
I use the fully printed piece as the base of my design, and then I appliqué the various cut pieces for body parts, hair and clothing onto the fully printed piece. While that base layer informs the overall design, I give myself permission to make changes as I see fit throughout the entire creative process. As I appliqué the pieces together, I also use different threads and embroidery stitches that often result in changes from the original design.
Once the appliqué and stitching are complete, I finish the work by facing all of the edges. I attach the facing from the front and then turn it to the back and secure it with hand stitching.
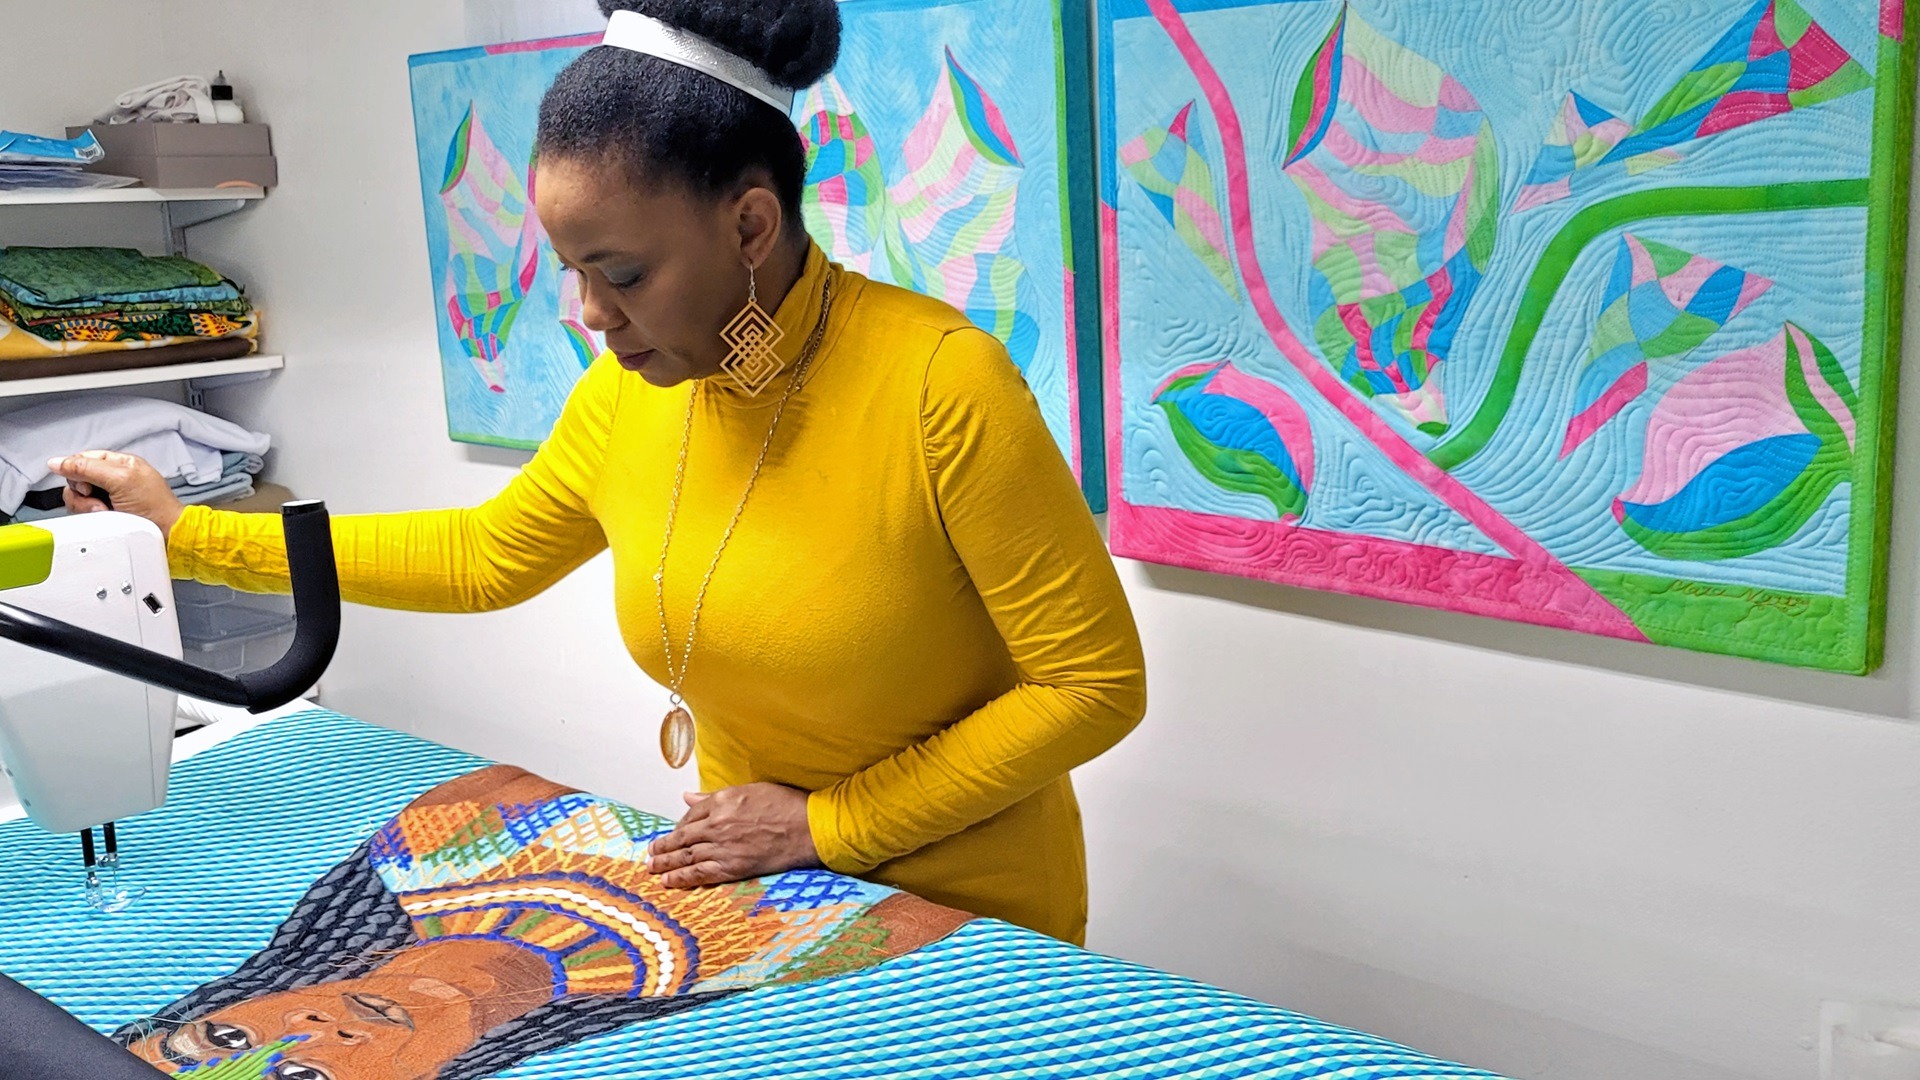
For the embroidery and quilting part of the process, I use a Juki 2010q sewing and quilting machine and a Handi Quilter Moxie longarm quilting machine. I assemble different colours of embroidery threads to match my original shaded sketch.
This is never 100 per cent accurate, though, since thread manufacturers don’t make colours to match my paintings, and I don’t consider what threads are available when sketching – so I’m always improvising.
I typically start with my subject’s face, then move to the hair and the clothing. The background is finished last. For very large pieces, I’ll usually build the figure separately, and then appliqué the full figure to the background.
I like polyester threads. They’re strong enough to stand up to my high-speed machine stitching. However, if I need a specific thread colour to complete a project, I’m open to using other threads.
“I don’t plan stitches ahead of time. I let the work tell me where they need to go.”
Clara Nartey, Textile artist
Not knowing how the work will ultimately turn out is the really fun part for me. It’s exciting because the final result is always a surprise. It’s never exactly as I imagined, and that’s just fine.
Free motion curve
When I began learning how to draw, I started a sketchbook project. I carried the sketchbook with me everywhere and committed to drawing something every day. I especially enjoyed pen and ink drawing, but it was a challenge knowing I couldn’t erase any marks.
As I gained confidence with pen and ink, I decided to do the same type of drawing on fabric. I also figured free motion machine stitching would be as unforgiving as pen and ink. So, I embarked on a self-imposed 52 week challenge in which I had to recreate every pen sketch I drew on paper using my sewing machine. That challenge helped me learn the foundational stitch vocabulary I still use today.
“I broke a lot of needles while I was learning! I easily went through a packet or more of needles a day.
But I wasn’t deterred.”
Clara Nartey, Textile artist
I wanted to find a way to both outline and create shading with my sewing machine. I also tried different stabilisers before I found one that worked. I had initially used leftover stabilisers from using my first embroidery machine, but they didn’t always work for free motion embroidery.
My top tip for those wanting to tackle free motion embroidery is to step away from the sewing machine and practise continuous line drawing on paper. Don’t lift the pen up until your drawing is finished.
Remember your drawings don’t need to be full works of art. Simple curves, lines and shapes are enough. Eventually, the more comfortable you become drawing on paper, the easier it will be to direct the fabric on your sewing machine.
Also, think about driving a car while using your sewing machine. Keep your hands on the wheel (fabric), your feet on the pedal, and your eye on the road ahead (your destination, not your current needle position). Quilting gloves and a teflon mat will help you move the fabric around more easily.
Lastly, be sure to change your needles after every six hours of stitching. The fast continuous machine stitching dulls the needles and will cause unnecessary troubles like broken needles or bad stitching.
Sharing the love
What I enjoy most about teaching is sharing with my students. I enjoy seeing how something I’ve learned can open a door for someone else in their own creative journey. It’s both my contribution and another way to create beauty in the world through others. My words and instruction become works of art through the hands of those whom I teach.
“I also want my students to believe in themselves.
No matter how much they learn, how many tools they acquire or how fancy their studio is, if my students don’t believe they have what it takes, none of that will do any good.”
Clara Nartey, Textile artist
I give lectures on unleashing one’s creativity and how to get out of a creative slump. I also teach art marketing, covering topics like branding, email newsletters, social media and getting into art exhibitions.
Personally, I’ve had a complex relationship with social media. I initially resisted it, and I’m a late adopter. I’m an introvert at heart, and I didn’t feel comfortable sharing everything online.
But the more I learned about making it in the art world, the more I realised I couldn’t avoid it. I create all my own content, mainly using my iPhone. For video editing, I use the InShot app, and for photo editing, I use Adobe Photoshop.
I use social media to promote my work – I share what I’m doing in my art practice, but I leave it up to the audience to decide whether or not my content is interesting. Algorithms are hard to figure out.
Sometimes I’d post something I thought was interesting, but it only reached a fraction of followers. So, I’ve decided to not let individual post metrics bother me anymore. I just share as events happen in my art practice to keep my followers up to date, and I think it’s working.

5 comments
Rita
Absolutely stunning! I don’t think people quite understand how hard it is to create portraits, and the way she does it is amazing.
Barbara D Bexley
These vibrant pieces of textiles are not only art works in there own right but are backed up by such a genuine artist making them. Keep up the good work, Clara, both in your textile art and in your teaching.
Clara Nartey
So glad you enjoyed the article, Susan
Clara Nartey
Thank you Barbara.
Susan Justus
The article about Clara Nartey just landed in my inbox – WOW! I am amazed by her skill, thrilled by her creativity and motivated by her determination. I just can’t stop looking at her creations. I also have to add… I just did a deep purge of my inbox and recognized what high quality of work regularly comes to me through TextileArtist.org. Thank you so much!