The alchemist experiments with her substrate media and ink-receptive coatings. The digital technologist manipulates her photographic imagery on a screen. The fiber artist moves between them; collaging, arranging, printing and stitching. A craftswoman of many guises, Wen Redmond’s digital fiber art is striking and instantly recognisable. Her layered photographic imagery is full of eerie and ethereal energy, leaving the viewer wondering how it was made.
Wen has received numerous awards for her work, most recently the Acquisition Award at the 2019 Handcrafted Juried Exhibition (Maria V. Howard Arts Center, Rocky Mount, North Carolina) and an Award of Merit at Fiber Arts IX in 2019 (Sebastopol, California). She is regularly invited to show her work and in 2019 she held solo exhibitions at the Ayers Loft Gallery in Lowell, Massachusetts and at the World of Threads Festival Corridor Gallery in Canada. In 2018 her work “Breaking the Surface!” was exhibited at the International Quilt Show in Texas and she exhibited at Quilt Nihon, Japan. Her work is held in art collections around the world and has been featured in numerous publications including TextileArtist.org, Fiber Art Now and Quilting Arts Magazine. Her book Digital Fiber Art was published in 2017.
Would you be surprised to find that Wen uses a home printer for such experimental, boundary-pushing print techniques? Look closely and you’ll see rippling texture, stuck on bits of foil, tape and fine organza layers. How is she able to print on such a wide variety of substrates?
In this week’s interview Wen demystifies her printing methods, with some tips on image composition and merging thrown in for good measure. Find out how she makes her textile artwork from conception to creation, moving from her starting photograph to its digital manipulation, through to printing, creating overlays and adding stitch.
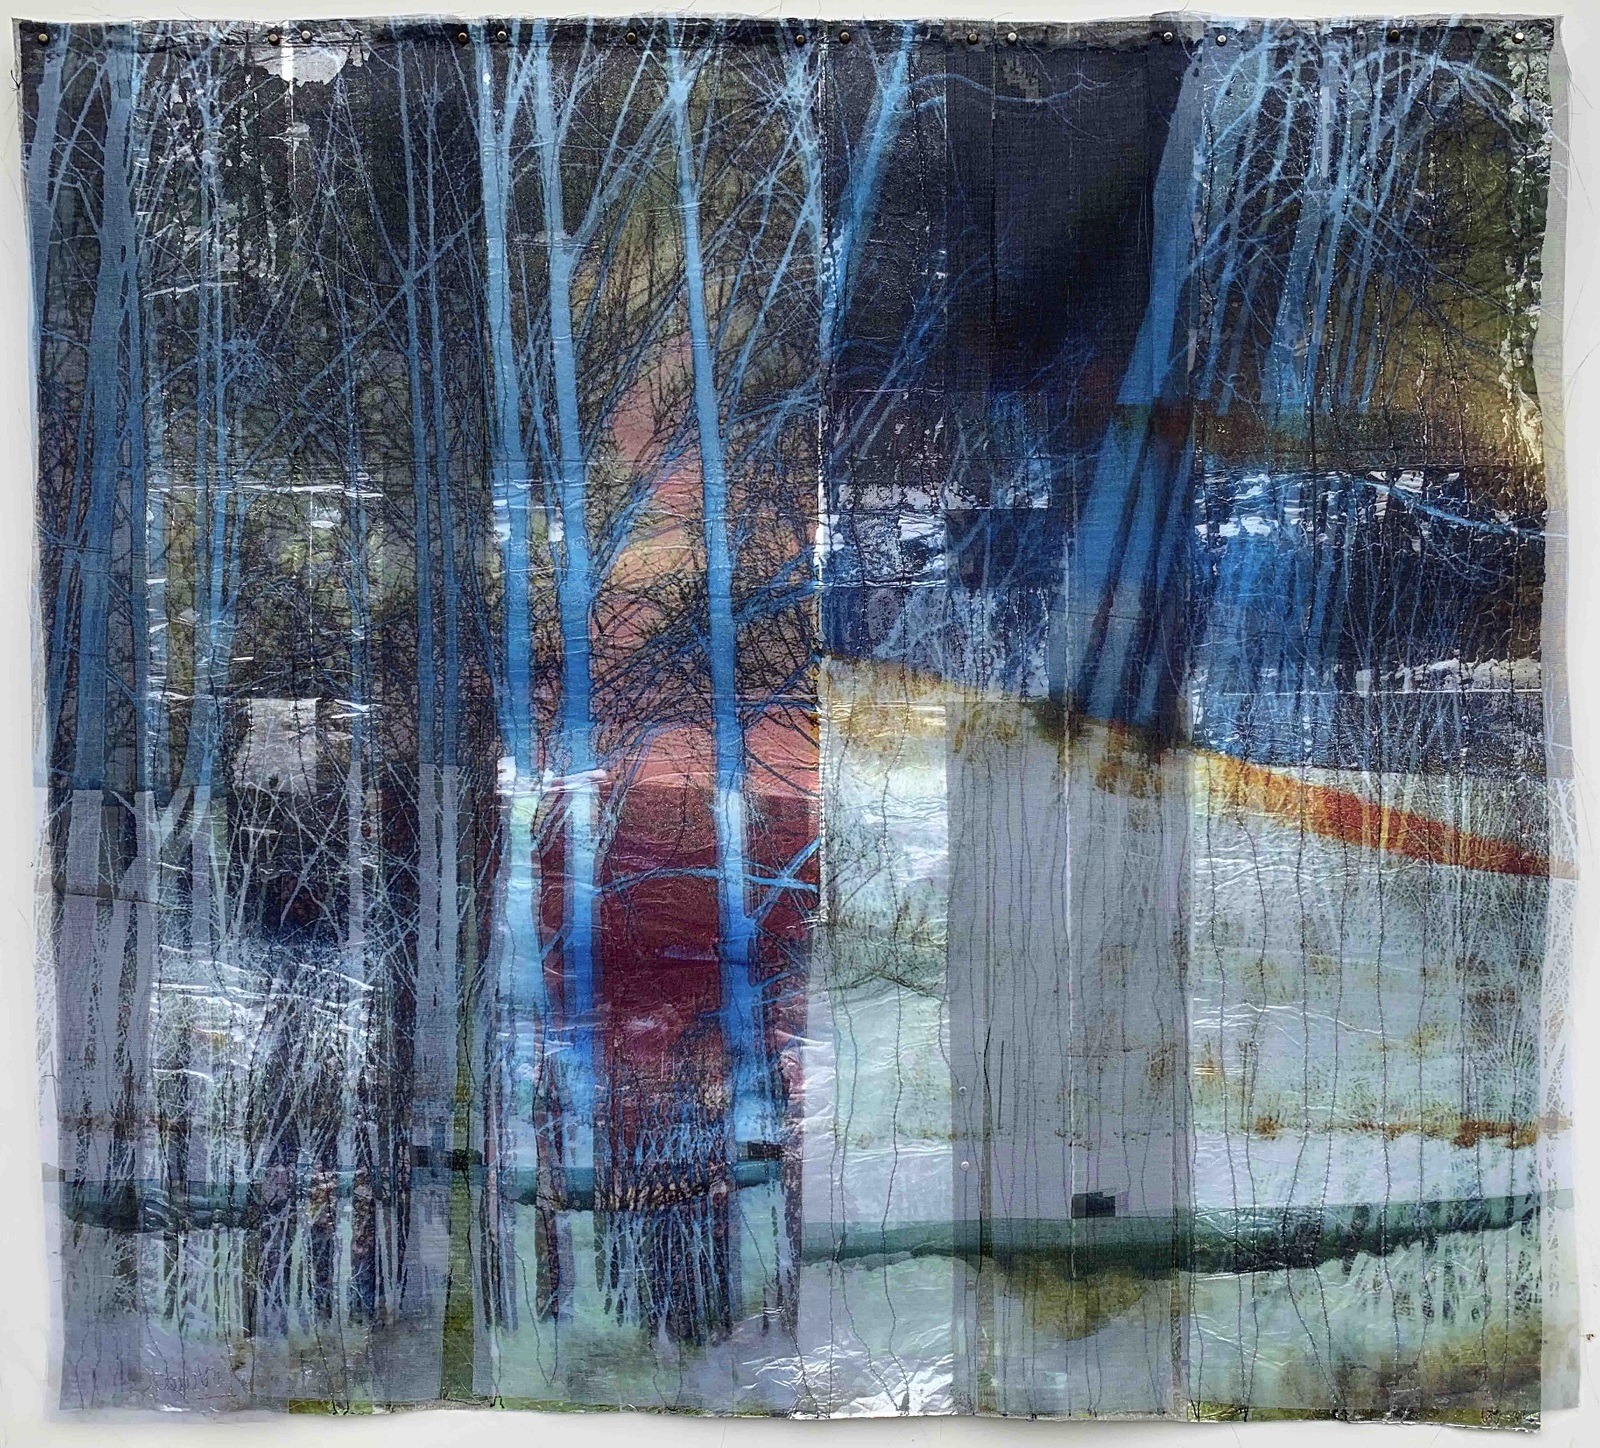
Name of piece: Drawing a Breath
Year of piece: 2019
Techniques and materials used: 24″ W x 22″ H, Under-collage created from flashing and duct tape on interfacing. Drawn lines were sewn with thread over a collage created with digital silk organza, printed with a created image and attached with brads. Materials: flashing and duct tape, interfacing, digital silk organza and brads
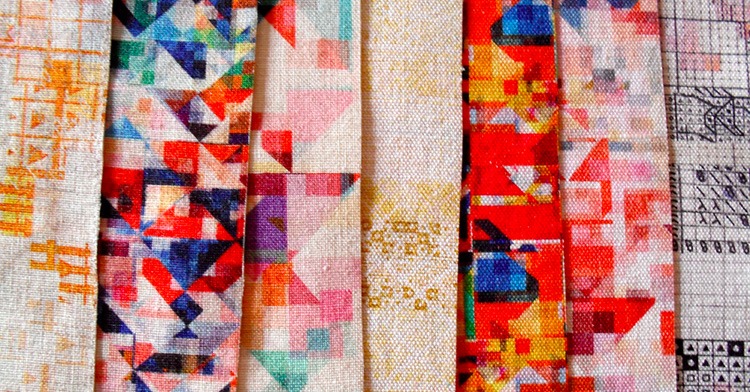
Merging and layering
TextileArtist.org: How did the idea for the piece come about? What was your inspiration?
Wen Redmond: I love photography. My fascination with it led me to experiments printing manipulated original photographs directly onto various mixed media substrates and specially treated natural materials, to create unique stitched photographic textural constructions. I call this work Digital Fiber Art.
I continue to investigate the digital world, aiming for imaginative presentations that add to the feeling that I am a pioneer through the exploration of my chosen media. This gives my work edge. Each work is unique and created individually.
What research did you do before you started to make?
Through continual experimentation, I build on my past work for each new project. My work has evolved over time into what I’m doing now.
I have a long history using textiles in many different ways, including collage, soft sculpture, batik and surface design.
Experimentation is the key.
I test various materials for printing to see what works and what results I like. When I create an image for a project, I take time to make the right substrate. I create several 4 x 6″ samples of the same construction to use for preview prints. I do this for several reasons; I need to be sure that I like the image on that particular substrate before printing it and I want to make sure the colour is correct and that the printer ‘likes’ my substrate.
Once that stage is complete, I can print.
To achieve the images I am aiming for, I mostly use Adobe Photoshop but I also investigate the many other software applications available. I enjoy merging photographs or layering them to create unique images for my work.
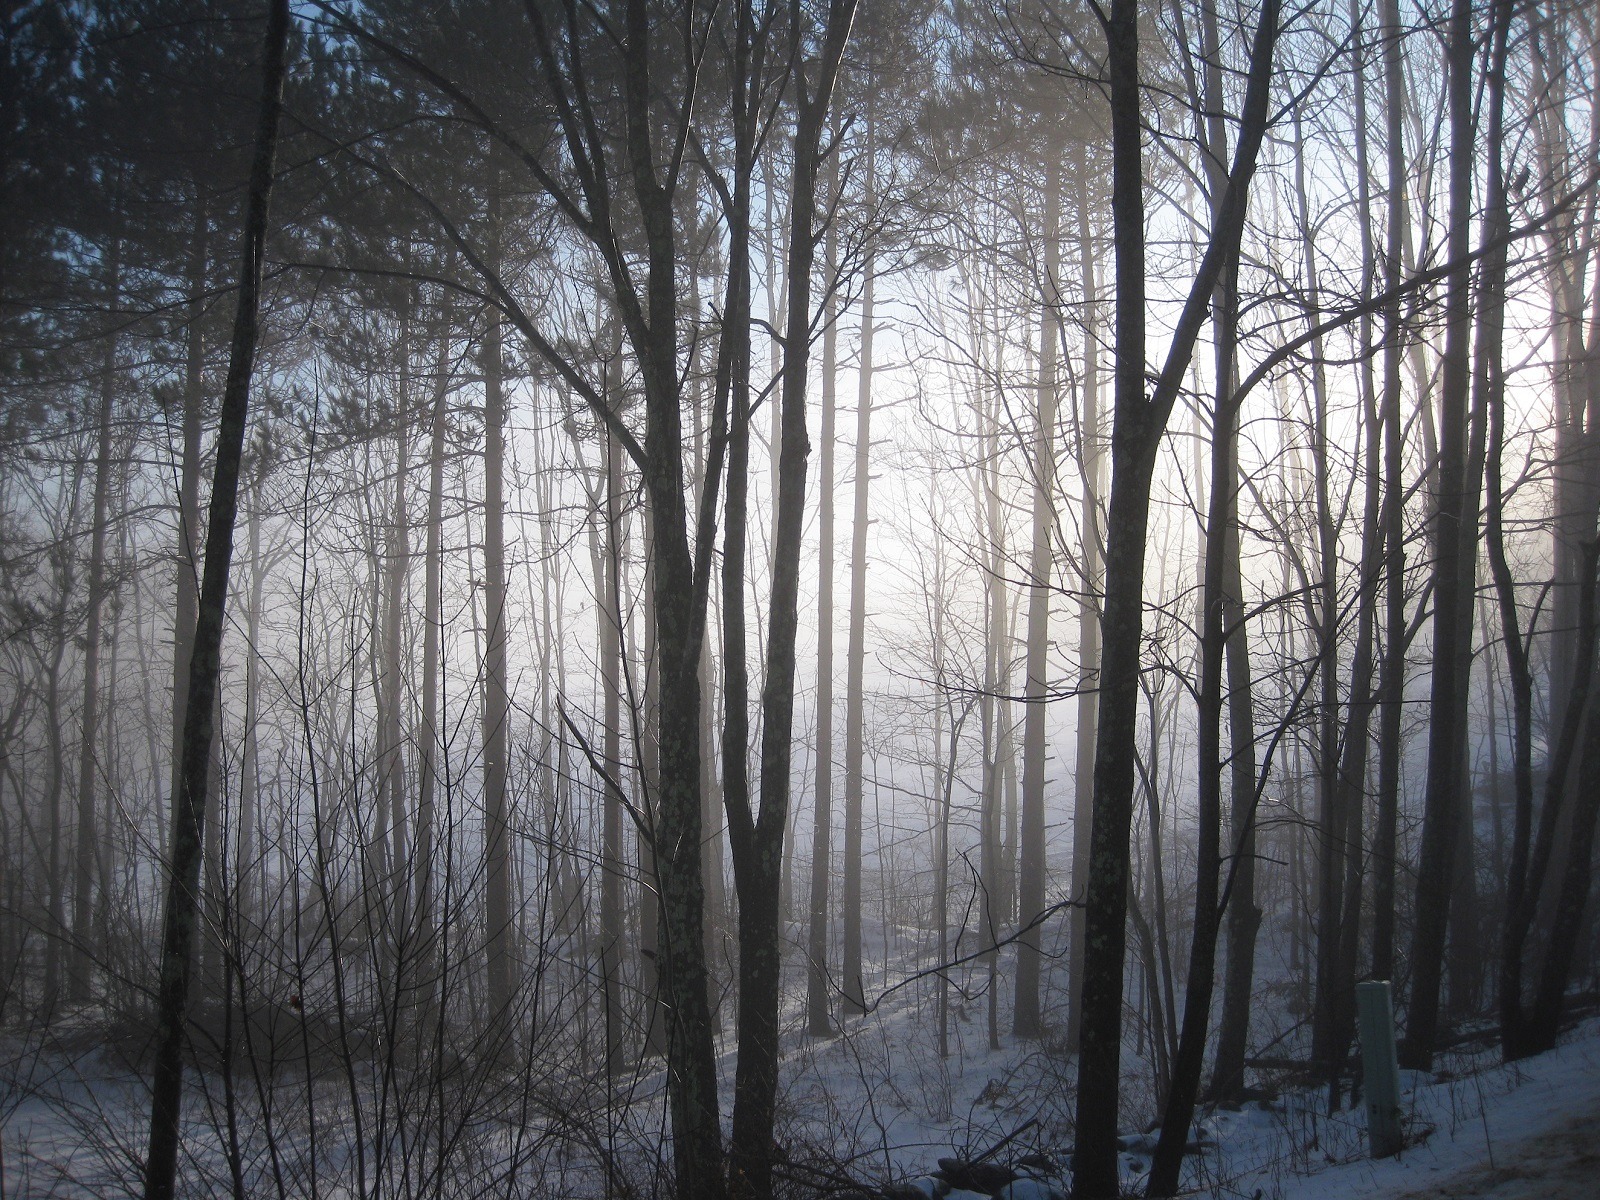
I take pictures of many things but nature seems to be my favourite subject. I also photograph my painted fabrics, dyed scarves or other colourful items such as rusting metal. I merge the sets of images to create another image. There is a lot of trial and error but it is exciting to see the results. Generally, I do this work in batches and save the images in a file folder on my computer until I’m ready to work on a piece.

Constructing the substratum
Was there any other preparatory work?
Photography is the major preparation work required.
Looking is paramount. Being aware. This is done on an almost daily basis. A photographer looks with a tender, sensitive eye, almost unconsciously. Our eyes may be open but are we really seeing?
The construction of the print substrate involves deciding what image might work best for a particular substrate. Sometimes the image comes first and I make the substrate for especially for it. Or I may be inspired to create a substrate and then find an image that will work with it.
Is it a dark substrate? If so, I’ll choose a dark image or something black and white.
Does the substrate have a lot of unique detail I want to bring out? Then I’d choose an image with lots of white content. Printers don’t print white so those areas will be transparent with the substrate showing through.
Once these decisions are made, I may need to divide the image into sections in order to create a larger work. I also size up the image to the finished size that I want to make. Resolution is not much of an issue for me. I decide on the size of each print, then I select sections and copy and paste them into a new file. Each file is a section of the original image. A 24 x 36″ image may be divided into four sections of 12 x 18”. I label each new file ‘left top’ and ‘right top’, ‘left bottom’ and ‘right bottom’. If I have more sections than that, I label them 1-10, going from left to right.
The size of each file depends on what size your printer prints. I have 3800 & 2400 Epson Stylus printers. They print 17” wide and 13” wide. When you print each file, you may need to create a custom size via the printer settings. For simplicity, you can also find out what sizes your printer offers and adhere to those particular sizes instead.
Once I have the images ready, I create the substrates the same size.
Most of the time I apply digital grounds before printing. These are ink-receptive coatings that you add to your substrate material. I use digital grounds from www.inkAid1.com. They have handy-sized samples that you can purchase to try them out. Basically you simply paint one or two coats on your substrate, depending on what you are using, and leave to dry. I leave it overnight to be sure it’s completely dry. I’ve described this process in detail in my book.
What materials were used in the creation of the piece? How did you select them? Where did you source them?
I’m in the process of bringing other materials into my textile works. The idea of using recycled or easily found ‘non-precious’ materials is of interest to me.
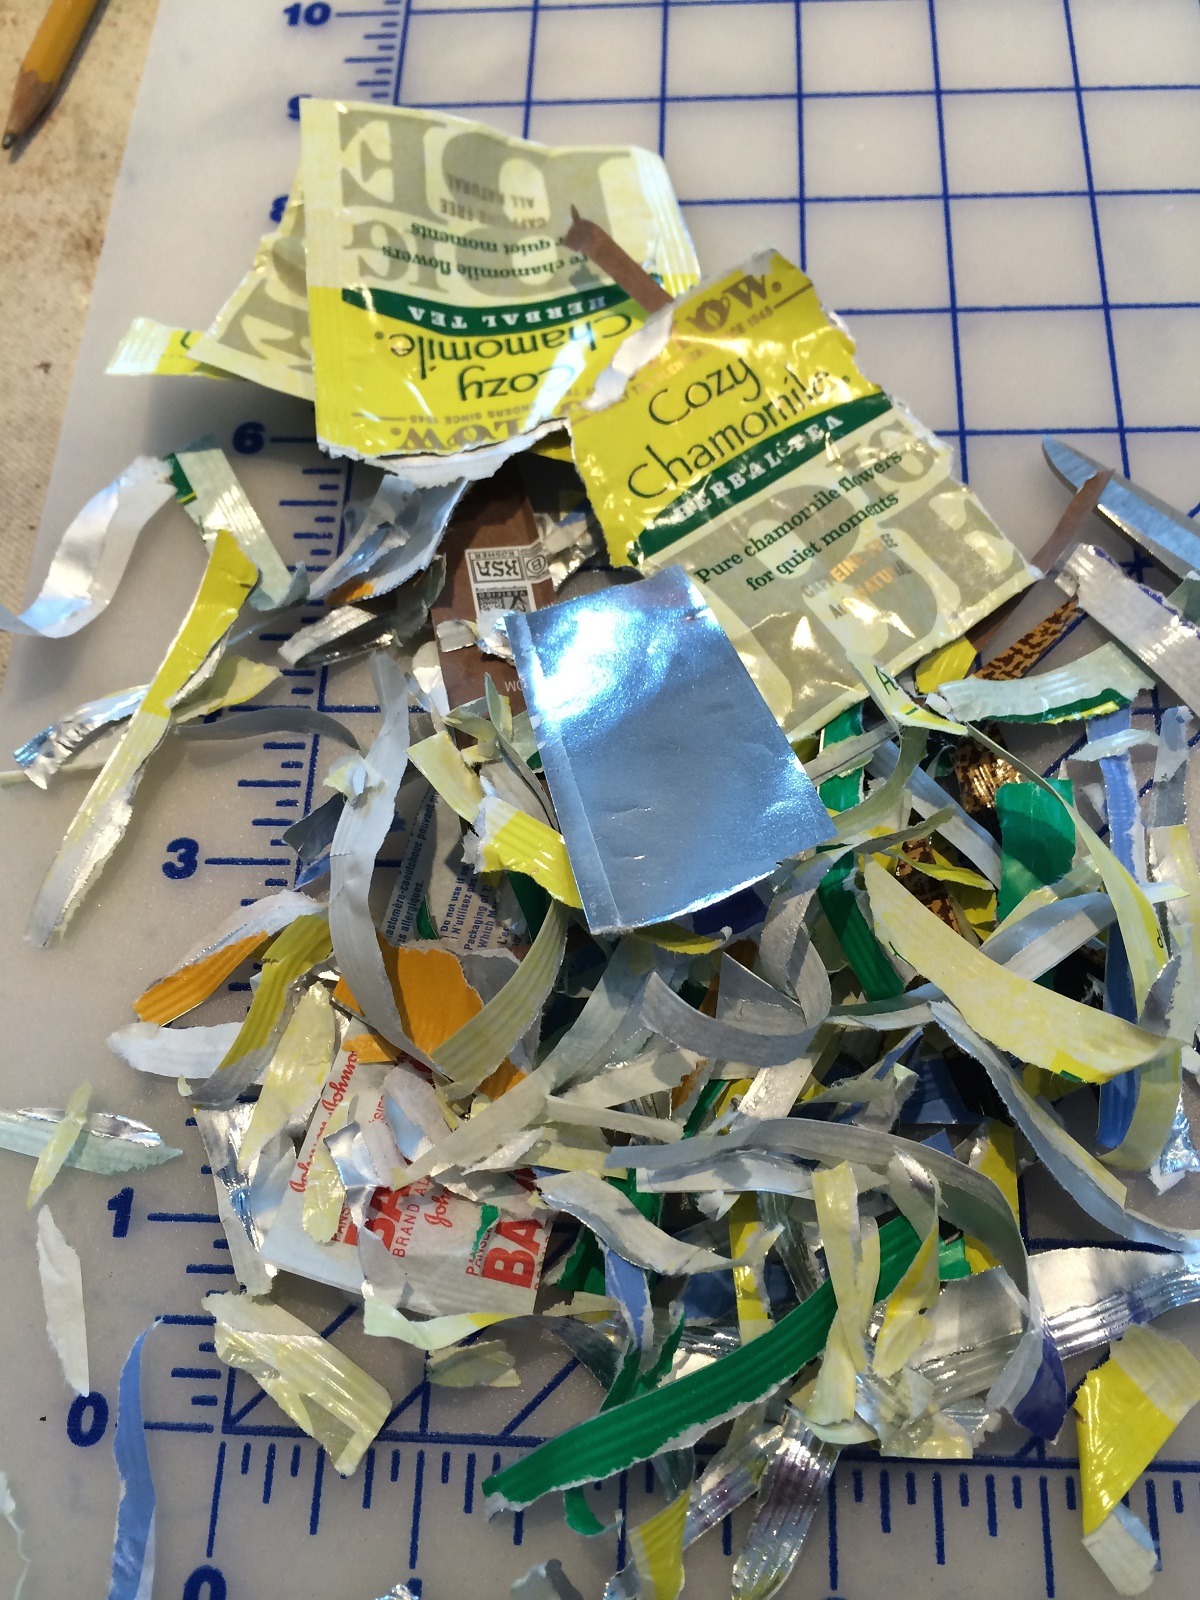
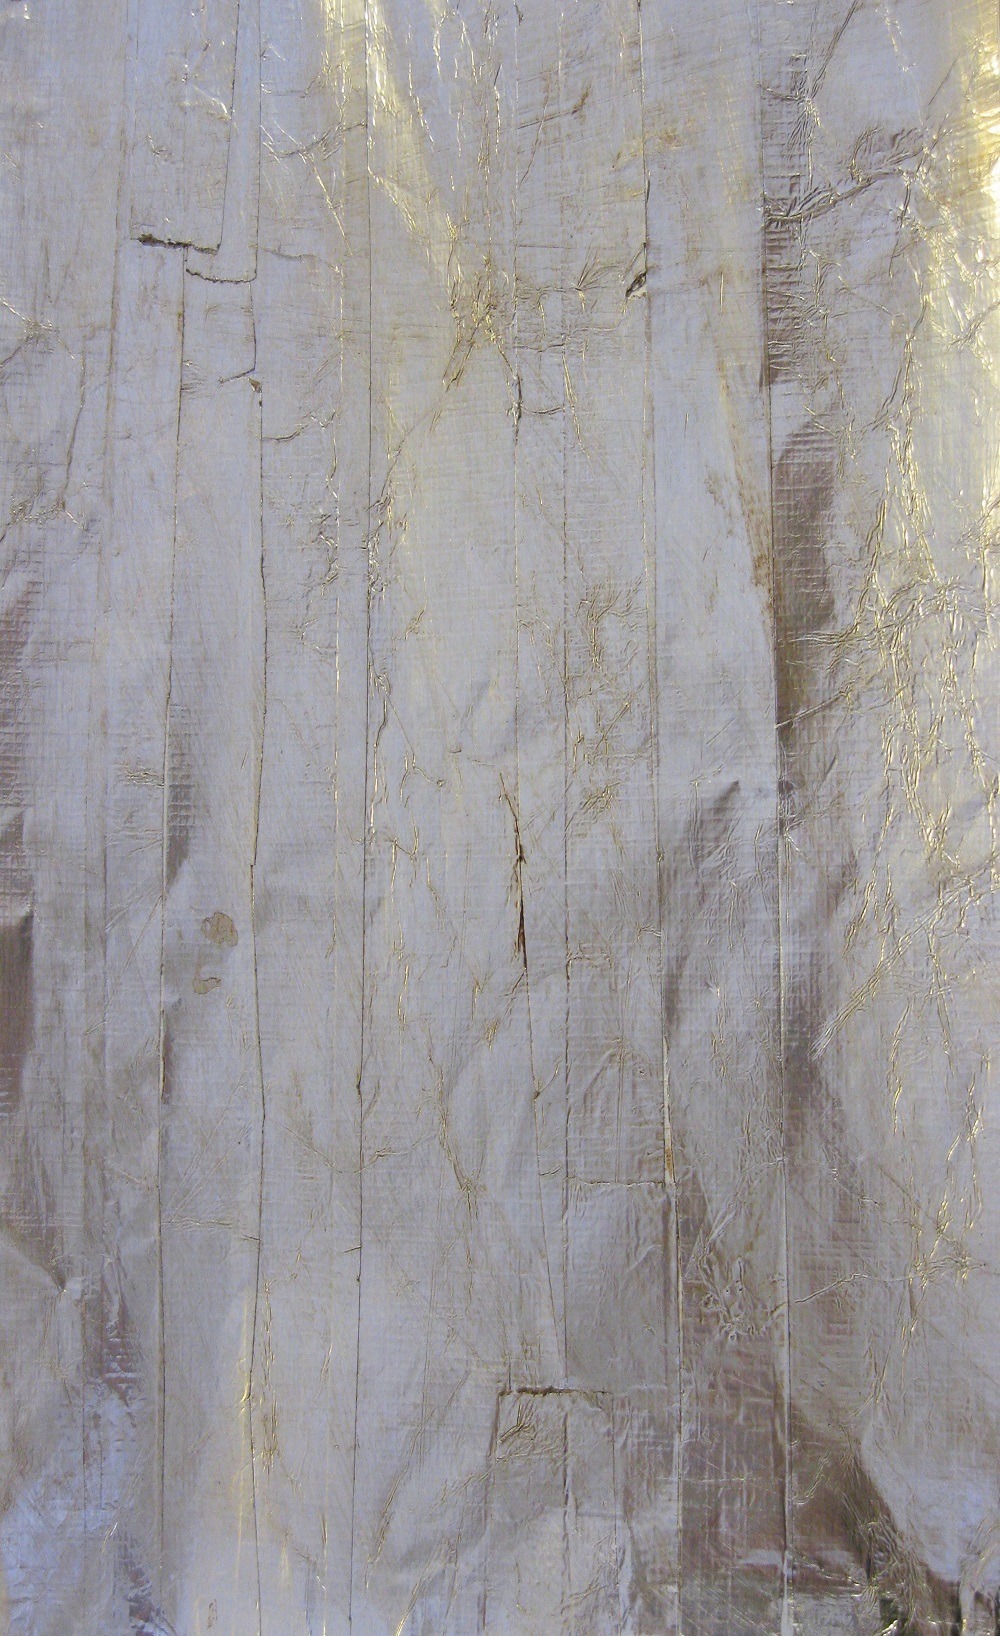
Recently, I’ve been curious about using a variety of non-porous substrates like duct tape, flashing tape, aluminium foil and origami foil, as well as found materials like matt silver teabag liners.
I like the way they interact with printing, making the images appear to glow. However, they are non-porous so they do need a digital ground in order to make the inkjet ink adhere permanently. Non-porous grounds come in clear form and many iridescent colours.
What equipment did you use in the creation of the piece and how was it used?
I have several inkjet printers as I prefer to print my own substrates rather than use a commercial printing company.
I like to ‘make it my own’ and by doing the printing myself I am able to try out almost any material as a substrate. I can paint fabrics, interfacing and even Lutrador. I use plain paper, art paper, book text or old letters, painted and unpainted. These can be printed whole or cut or torn apart to create collage substrates.
The only limitation is the depth of the finished substrate. Most printers can take a thickness of an envelope or card stock.
Photo Stylus inkjet printers by Epson are my favourite. The ink is guaranteed to last 200 years, and is fade- and water-resistant. In combination with the digital grounds, my work will be long-lasting and permanent. Look for any inkjet printer and ink with these qualities in the printer specifications. Any printers that use heat will not work for these processes.
After my work is printed and hand-finished, I apply a liquid satin varnish on absorbable surfaces or a spray varnish for non-porous surfaces. The spray is used because if you apply with a brush on non-porous prints, you may lift the printer’s ink from the surface. If you must brush, apply quickly without much stroking. If you use the spray varnish, do so in a shaded area outside, with the wind blowing the spray away from you so you don’t inhale it. It will need to dry for a while before you bring it inside as it has a strong smell.
Superimposed photographs
Take us through the creation of the piece stage by stage
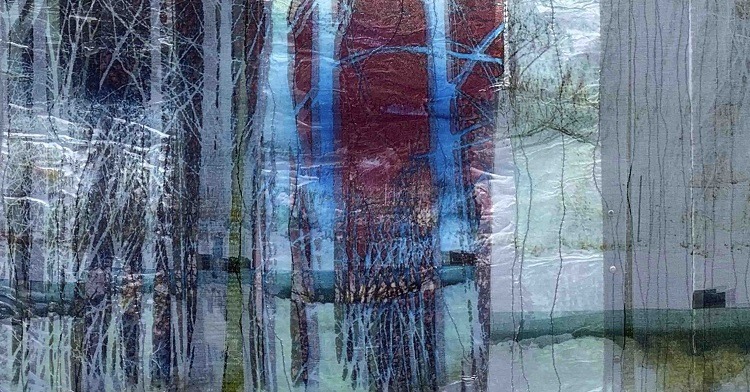
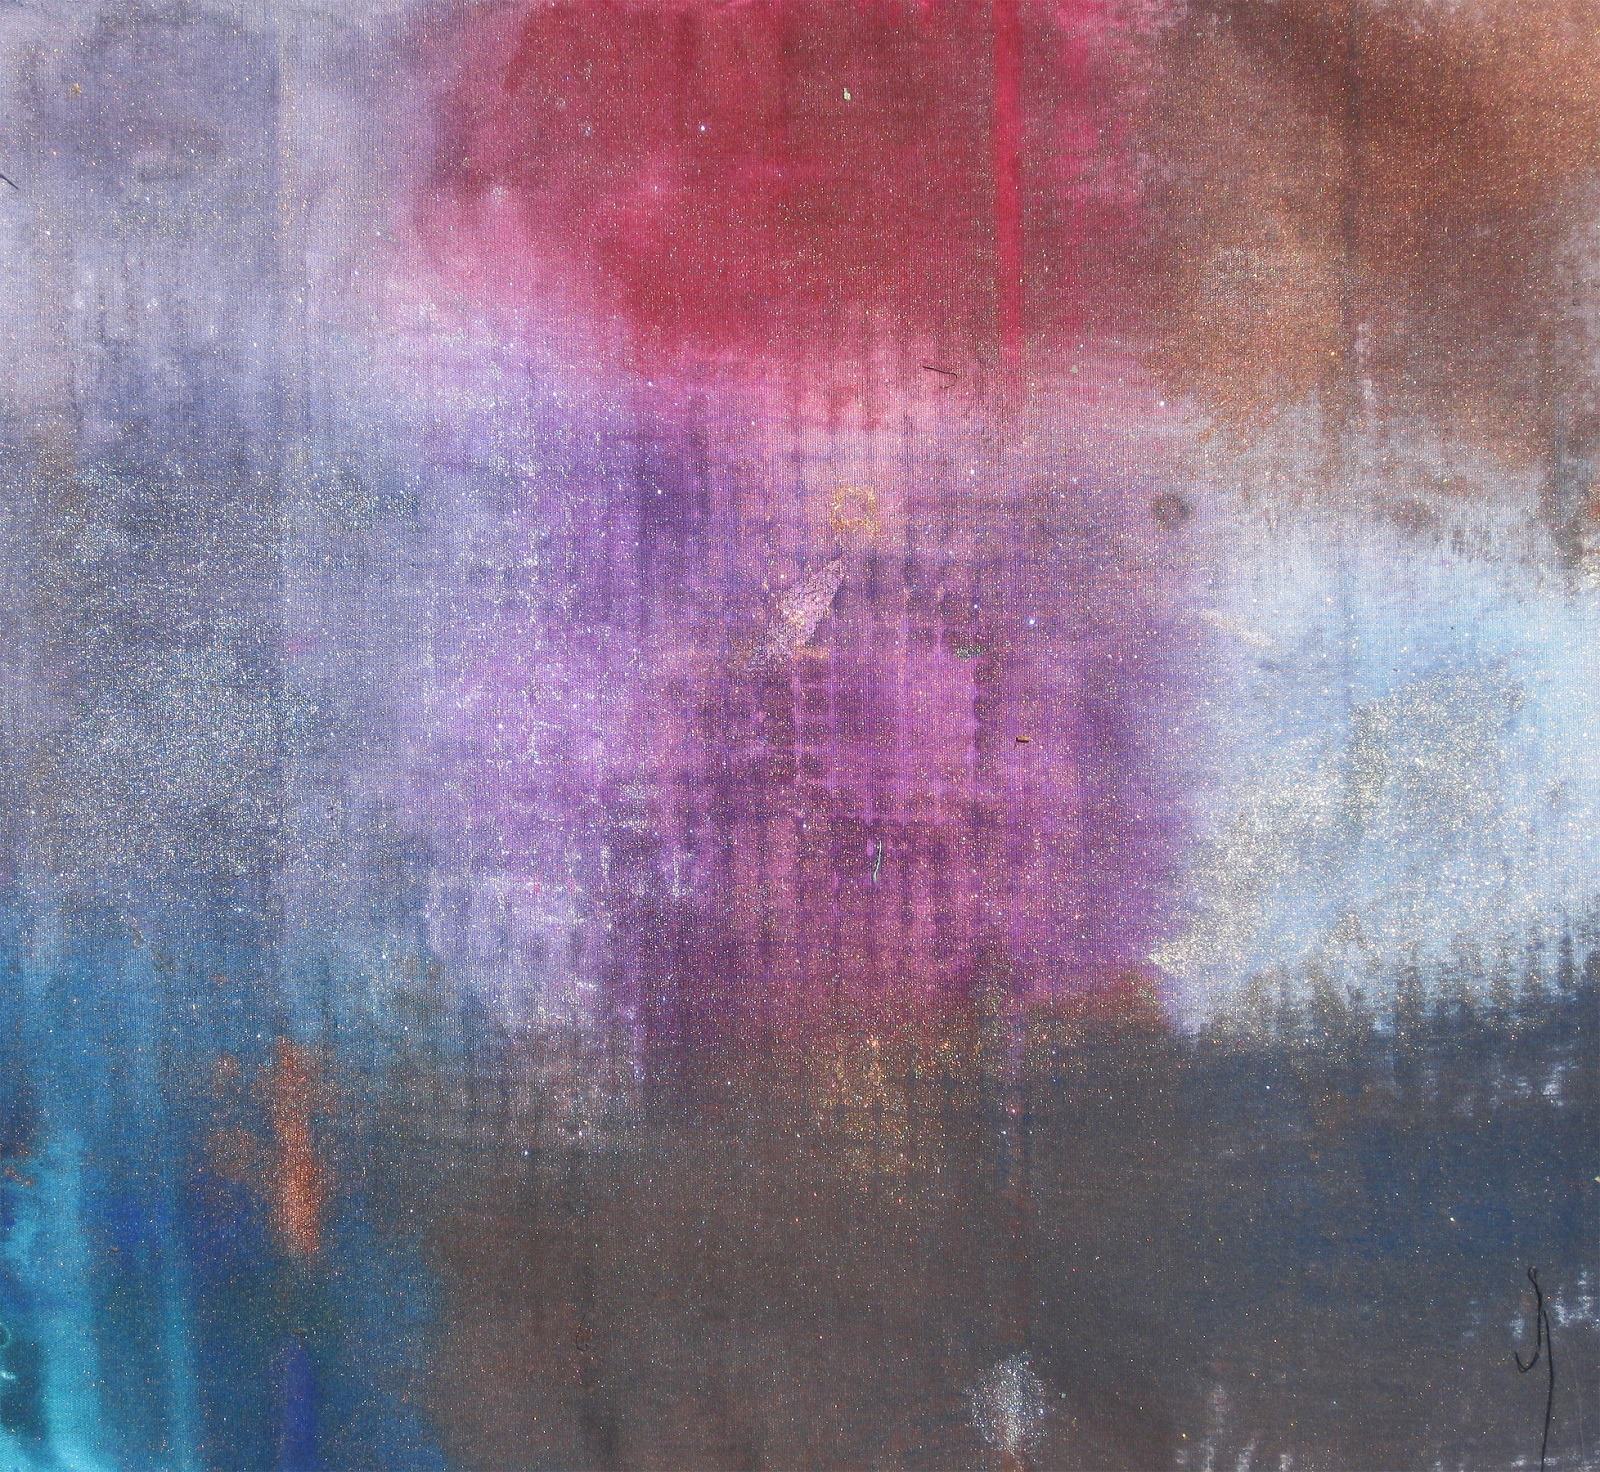
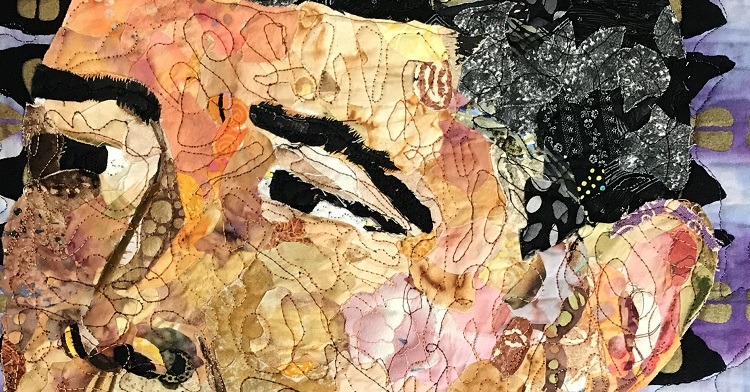
Drawing a Breath is a Digital Fiber Mixed Media work. It’s an exploration of creating a photographic print on alternative substrates. Recycled or unusual materials give unique and more interesting results than simple paper or fabric alone.
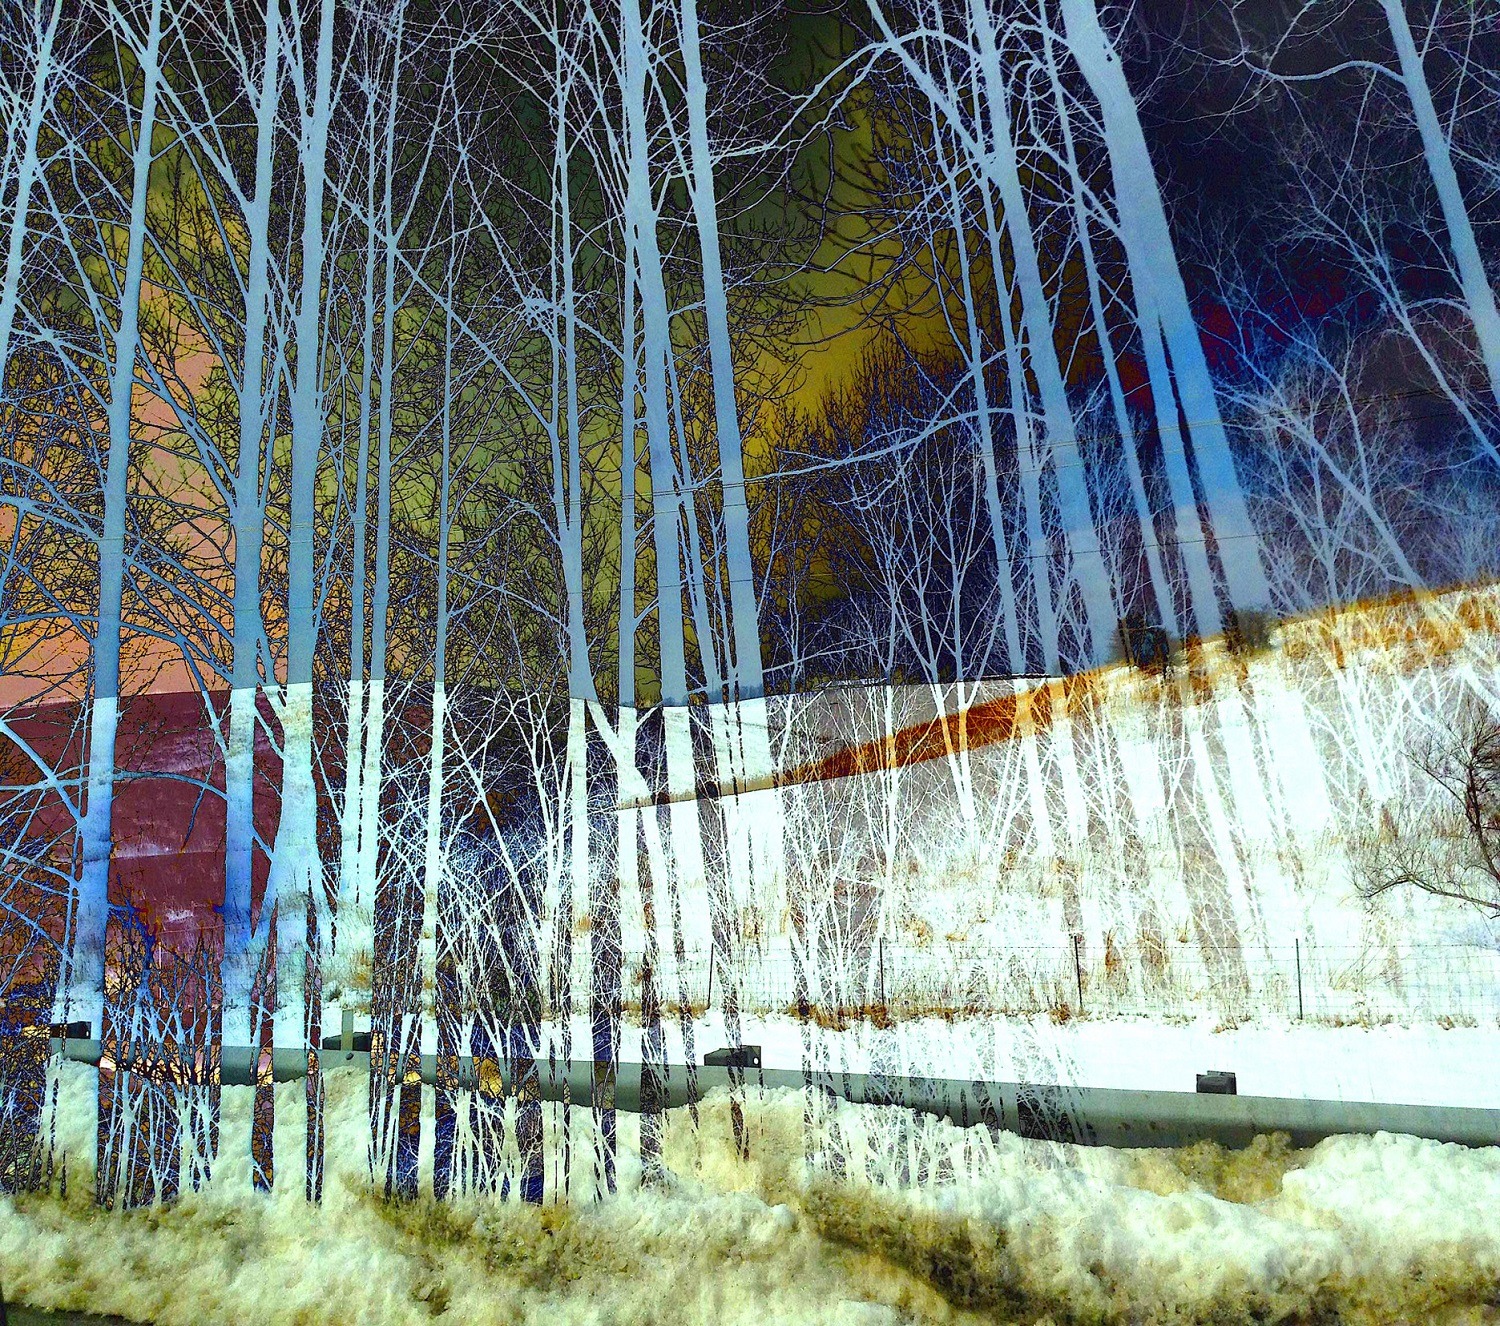
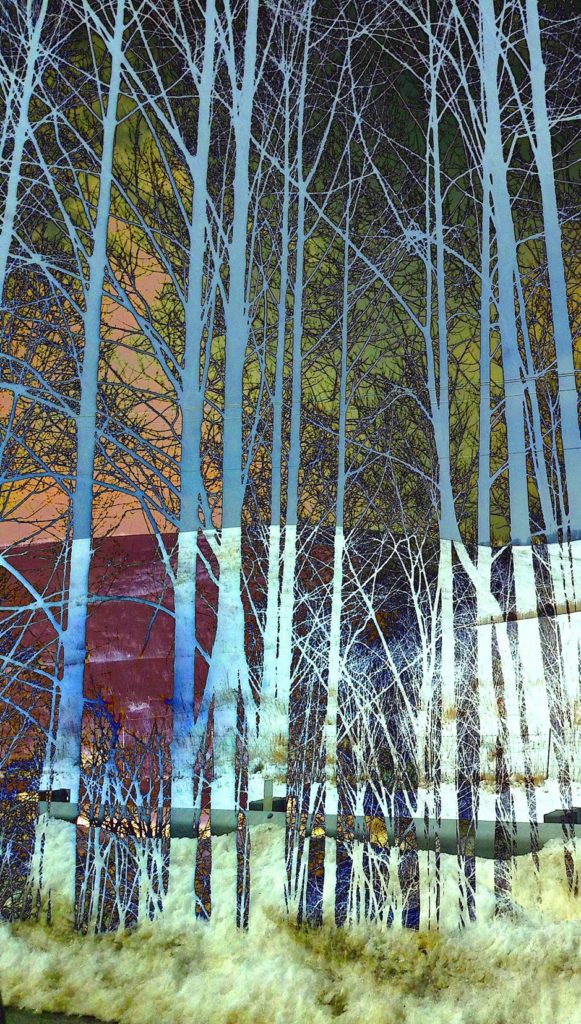
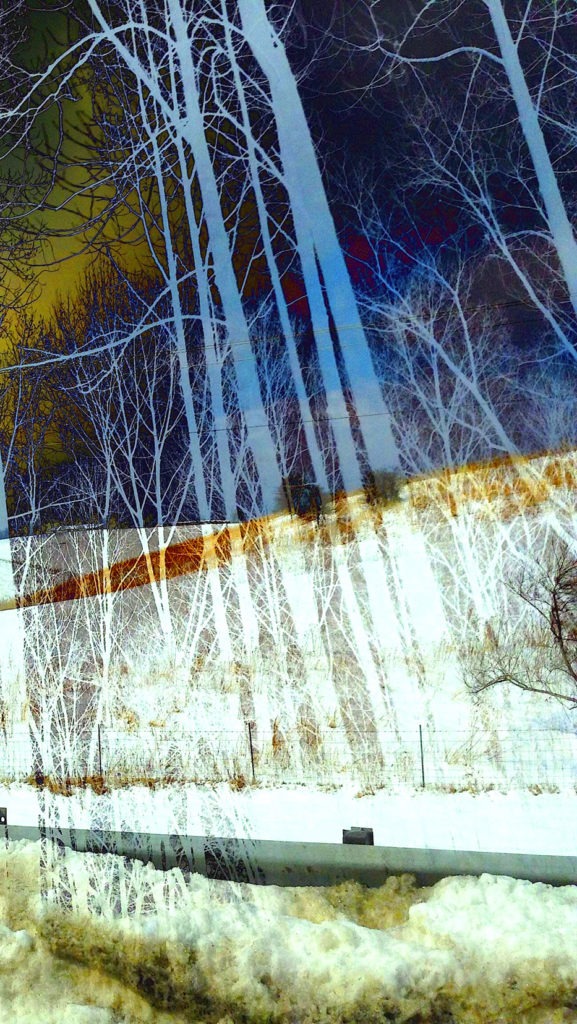
The image was created in several trial and error steps. Starting with an original photo, I layered several photos over the top and merge. (images shown in Q1 and image 3) In this case, I layered an image of my painted cloth.
After that I tried copying and pasting sections of the original photo, adjusting the colour each time, to create a less obvious image merge.
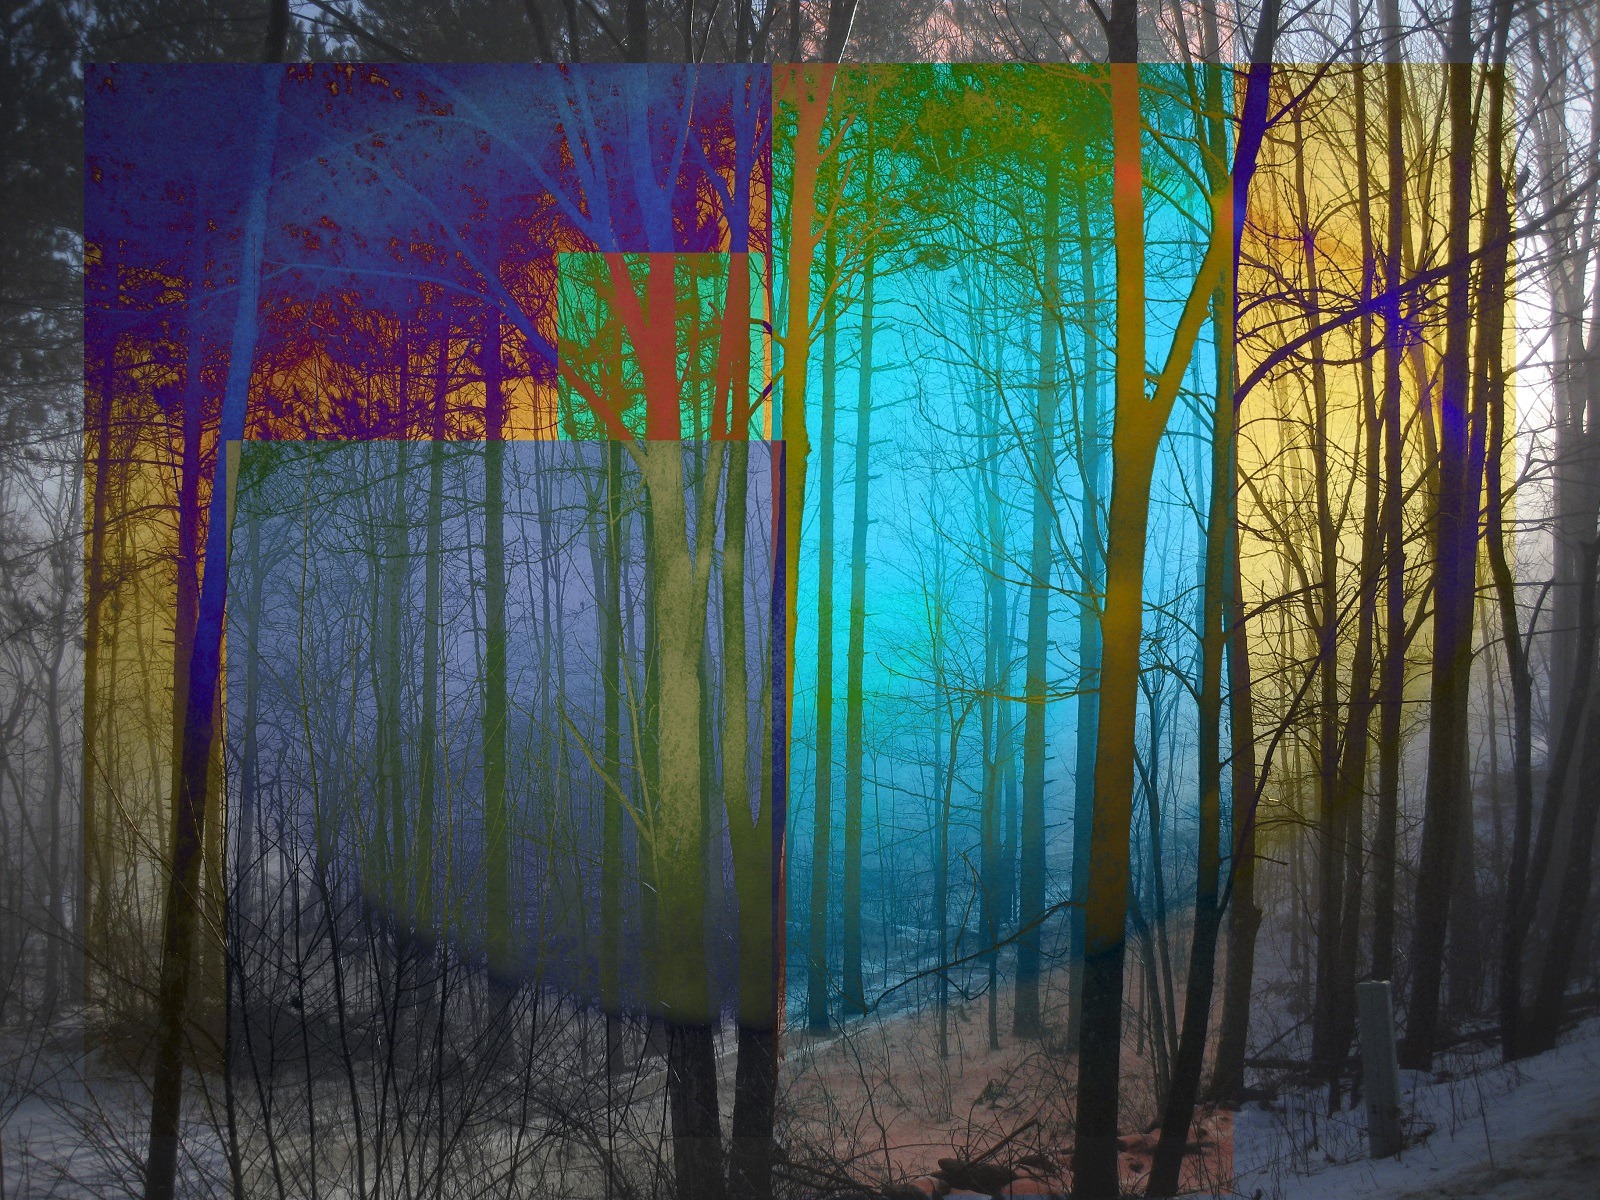
Eventually, after much playing, I created an image I really liked.
In order to make it into a slightly larger piece, I divided the 23 x 26″ image into 2 images 13 x 23″ . Then I needed to create the base in the same size.
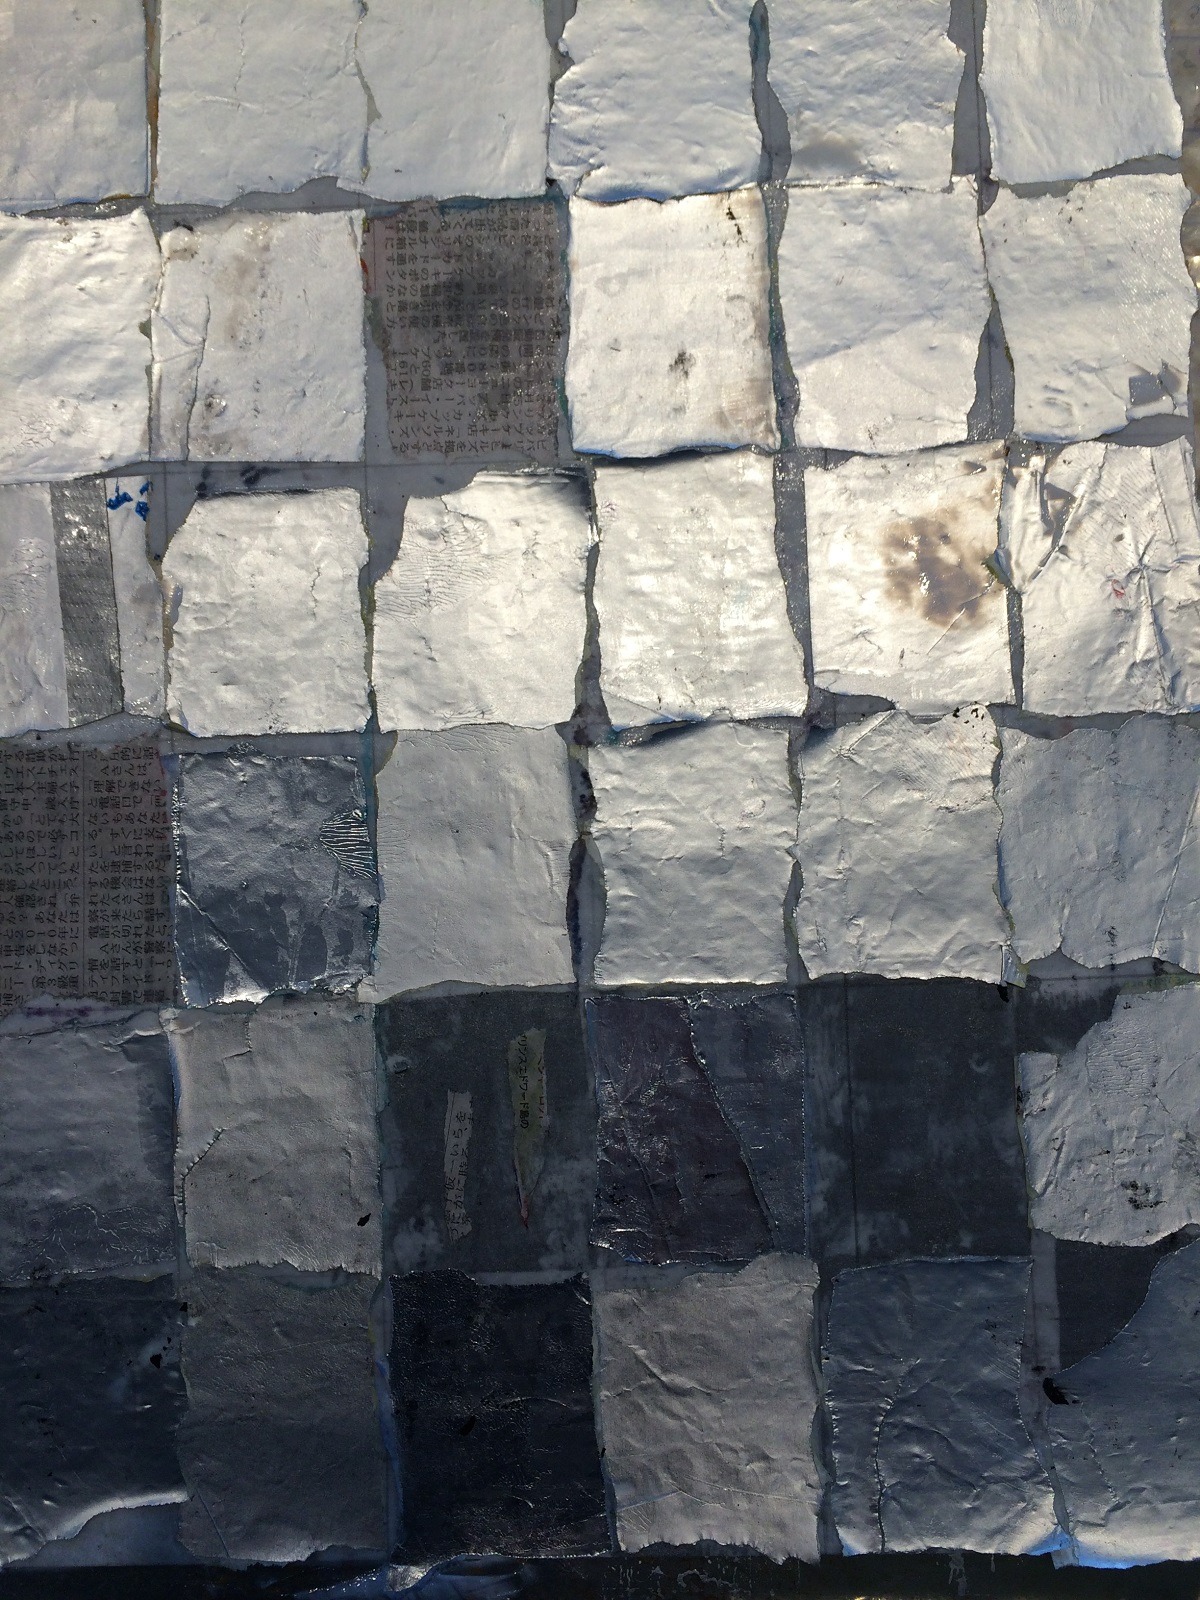
I decided to use flashing tape and duct tape as the printing base. I simply adhered the tape to some sturdy interfacing in strips. I used strips of each type to make my ‘under collage’. The interfacing, as well as my favourite products, are listed on my blog.
Once the base was ready, I printed my 4 x 6″ test samples. During this process, I decided I wanted a distressed image so I printed the images on simple T-shirt transfers. These can be found in most office supply stores. I taped several sheets together in order to have two sections of 13 x 23″. They needed to be ironed onto the receiving surface with a hot iron. I covered the sections with old, used transfers as protection from the iron, but you can also use parchment paper.
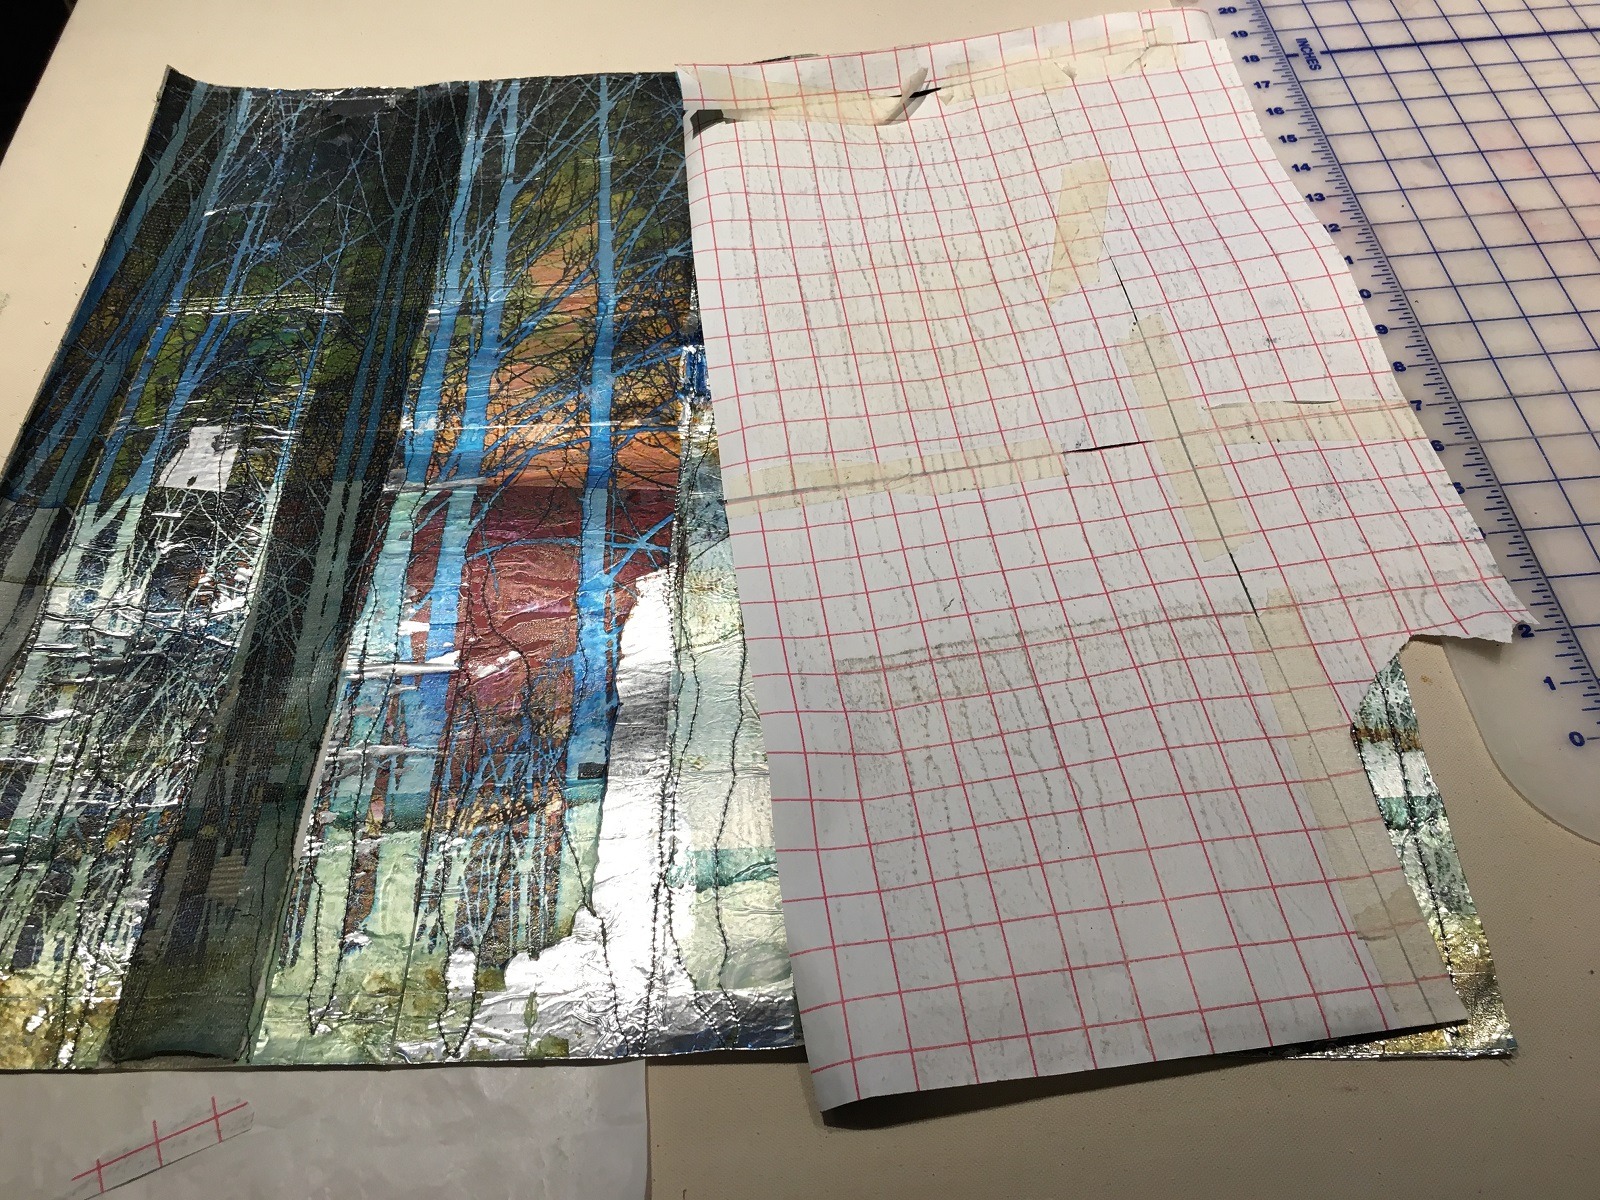
The duct tape is slightly darker than the flashing tape and I found it was heat sensitive. There was some melting going on but it worked well with the transfer, as I wanted it to look distressed and not perfect. I liked the result. Another ‘Ah-ha’ moment!
I trimmed the final piece to 22″ high by 24″ wide. The next step was to add drawn lines made with thread and also to sew the two sections together.
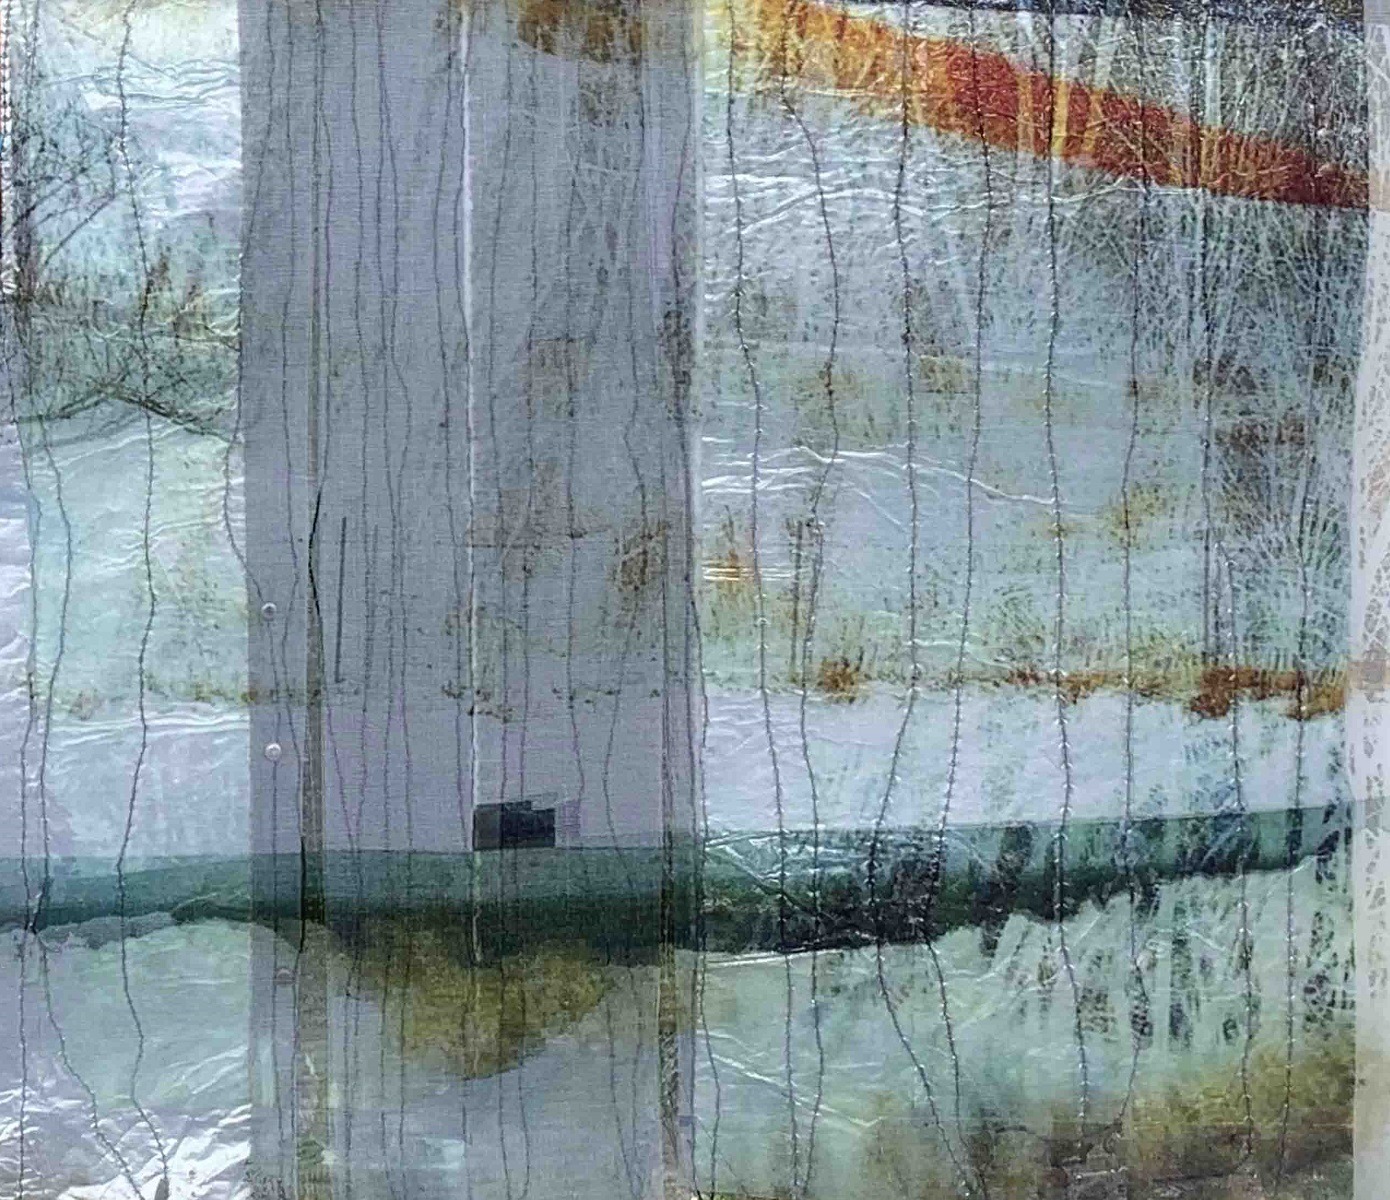
I decided to print an overlay on digital silk organza. This is the only commercial inkjet fabric I use now. It is transparent and works much better than if I had used digital grounds. The grounds coat the weave much like paint, creating an opaque result. I wanted to use the transparent digital silk organza as it allows the ‘under-collage’ to merge nicely with the overlay.
I cut the printed sections into several strips of different sizes and attached them to the flashing tape base layer with brads but only at the top, to allow the organza to float and move as viewers walk past it.
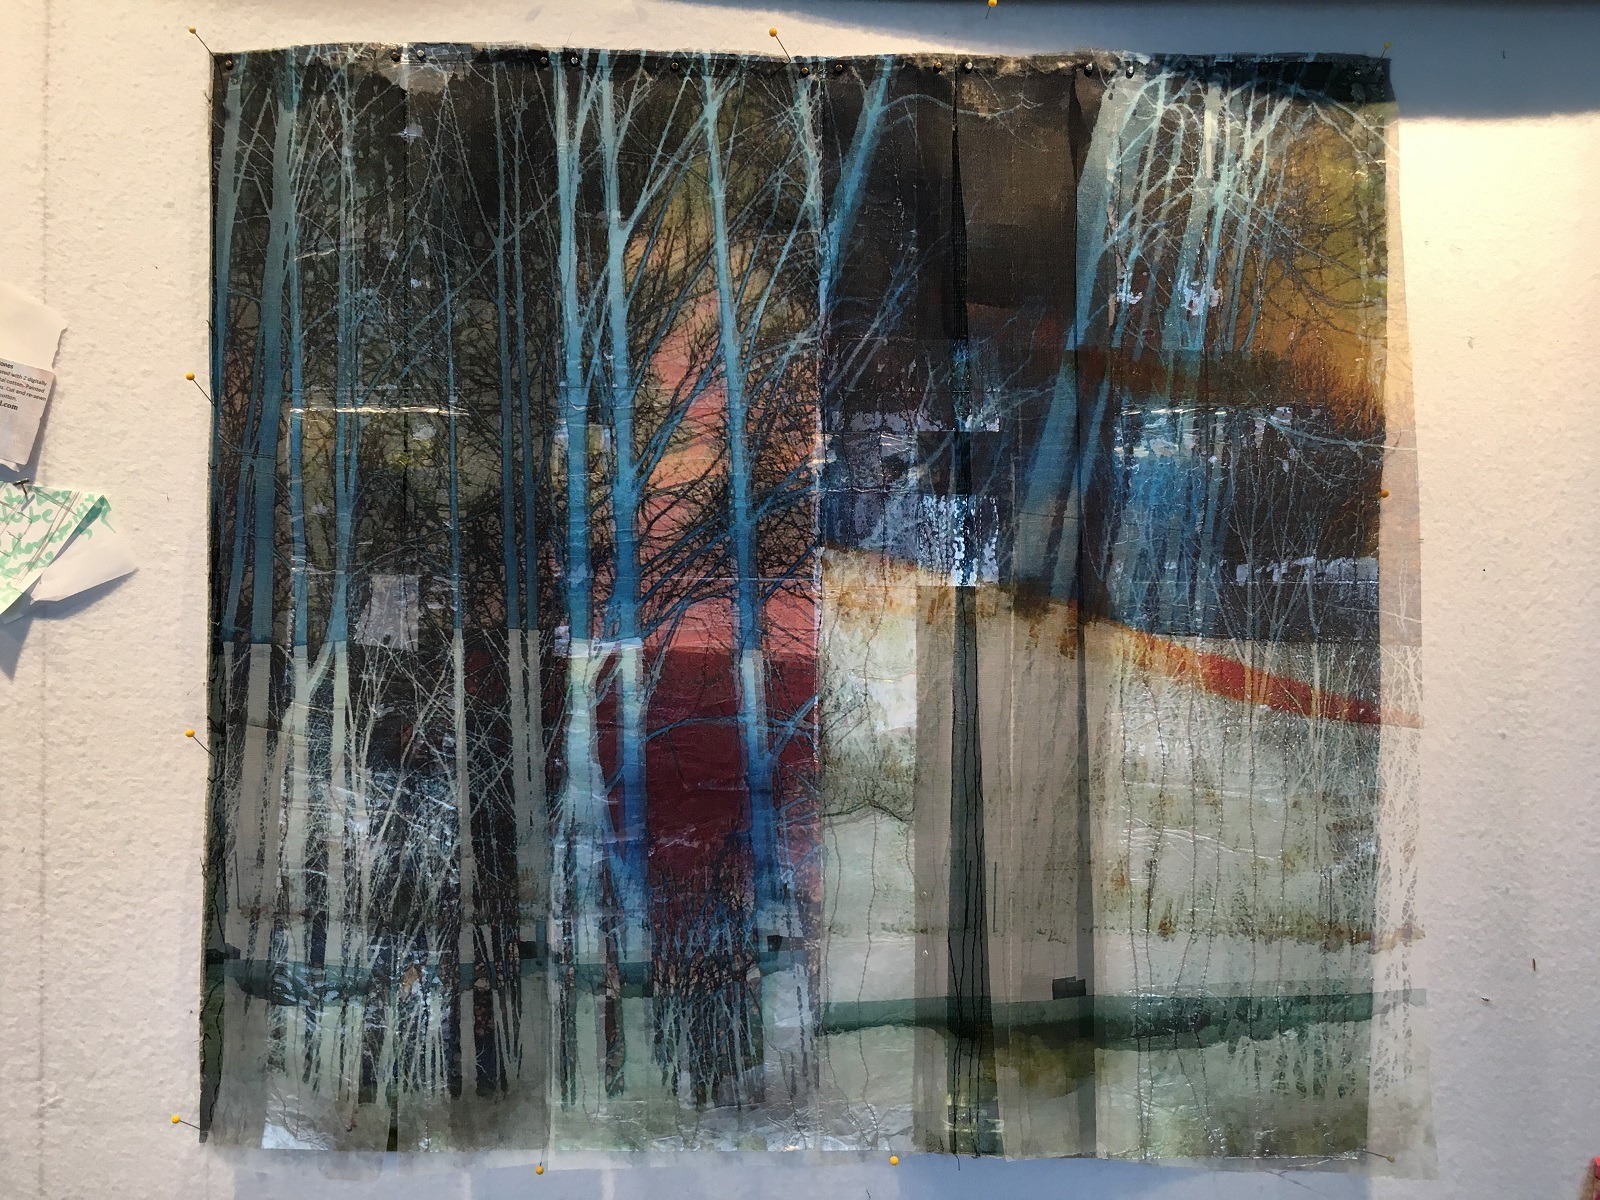
For the finished image of Drawing a Breath, I include a hanging tip for the exhibitors. I ask them to lightly grasp the bottom edges and fold backwards. Since the base is flashing tape, it is bendable. Once they have done this they can lightly smooth the front flat. This helps prevent the bottom edge of the piece from folding outwards.

What journey has the piece been on since its creation?
Since the piece is brand new it has just started its exhibition journey. It is presently showing at Form and Function: Fiber Arts for the 21st Century, San Jose Museum of Quilts & Textiles, California
For more information visit wenredmond.com
Did this whet your appetite for integrating composite photographic images into your textile art? Why not share this article with your friends using the buttons below?

2 comments
Dorothy Yuki
Wonderful! Thank you for sharing.D
MARIA MBELU
AMAZING TEXTILE ART WORK .SO FANTASTIC PATIENCE TAKEN WORK.
CONGRATULATIONS……